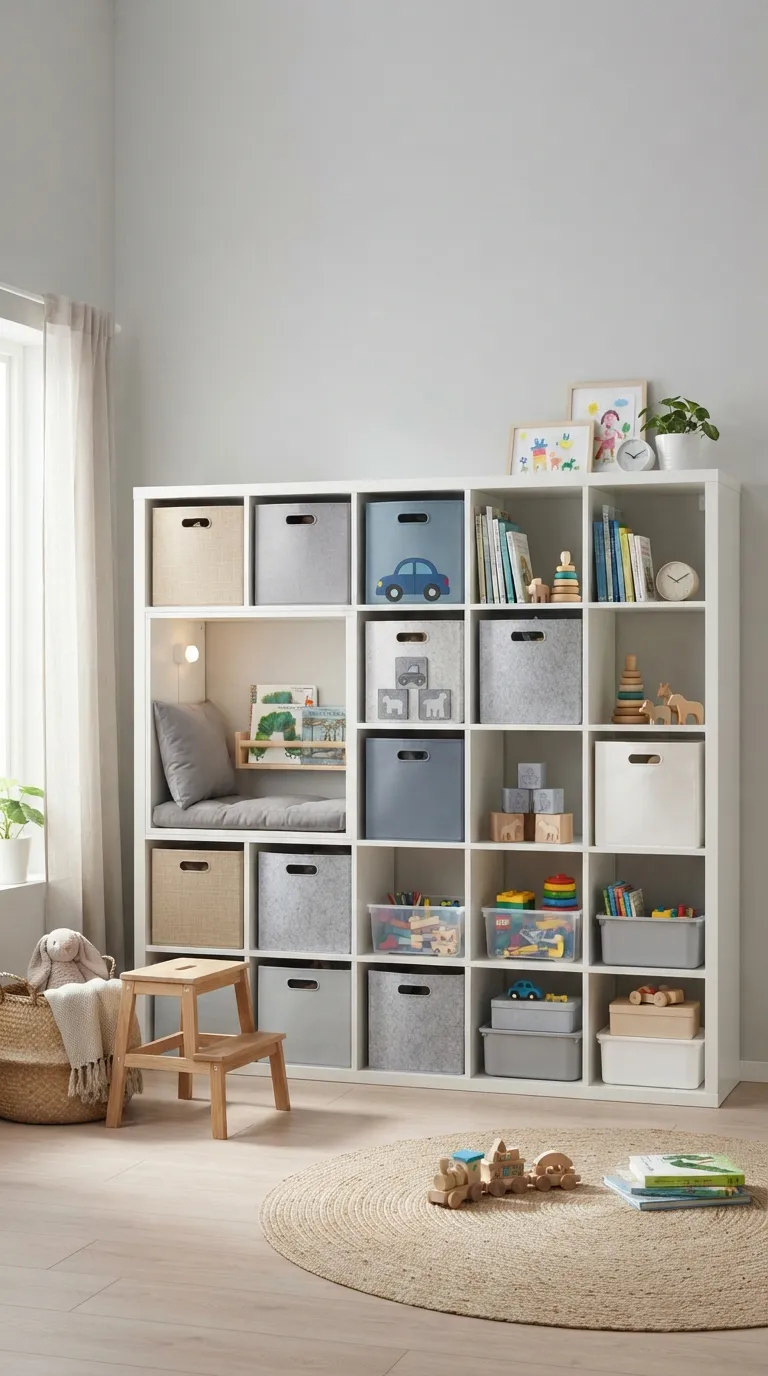
14 IKEA Kallax Playroom Ideas for Kids’ Toy Storage (That Actually Get Used)
A Kallax playroom system is just IKEA’s cube shelving turned into a sorting machine for toys one grid, a dozen bins, and a spot for everything that isn’t the floor. This guide walks through 14 ways to set one up for real toy storage, from toddler-height rows to labeled bins your five-year-old can actually use.
Done right, it means fewer wailing hunts for a missing puzzle piece and fewer evenings spent stepping on stray blocks. Cleanup stops being a fight when every toy has exactly one home. It won’t happen by accident the bins, the labels, and the height all have to match how your kids actually play. Pick two or three ideas below and the rest of the room tends to fall into place.
Jump To
- Why IKEA Kallax Playroom Storage Makes Such a Difference
- 14 IKEA Kallax Playroom Ideas for Kids’ Toy Storage
- How to Start Your Kallax Playroom Transformation
- Ready to Create Your Dream Playroom?
Why IKEA Kallax Playroom Storage Makes Such a Difference
The IKEA Kallax system turns four bare walls into a working toy-management grid, and it’s become the default playroom fix for a reason modular cube shelving (2×2, 2×4, 5×5 configurations) lets you scale storage to the actual size of the room instead of guessing. Original finishes run white, black-brown, and white-stained oak effect, with insert options in fabric, wicker, and hard plastic covering the open cubbies.
It’s having a moment right now because parents are prioritizing systems kids can use themselves over decor that only looks tidy in photos. In a small playroom, a single 4×4 unit against one wall usually outperforms scattered bins start there before adding a second piece.
| Best starting point | One 4×2 Kallax unit, turned horizontal, at toddler-reachable height |
| Biggest impact area | Bin labeling and toy category sorting |
| Budget to start | $130–$250 for one unit plus inserts |
| Time to complete | A weekend for setup, ongoing for the sorting system |
14 IKEA Kallax Playroom Ideas for Kids’ Toy Storage
1. The Toddler-Height Kallax Row: Cubbies Kids Can Actually Reach
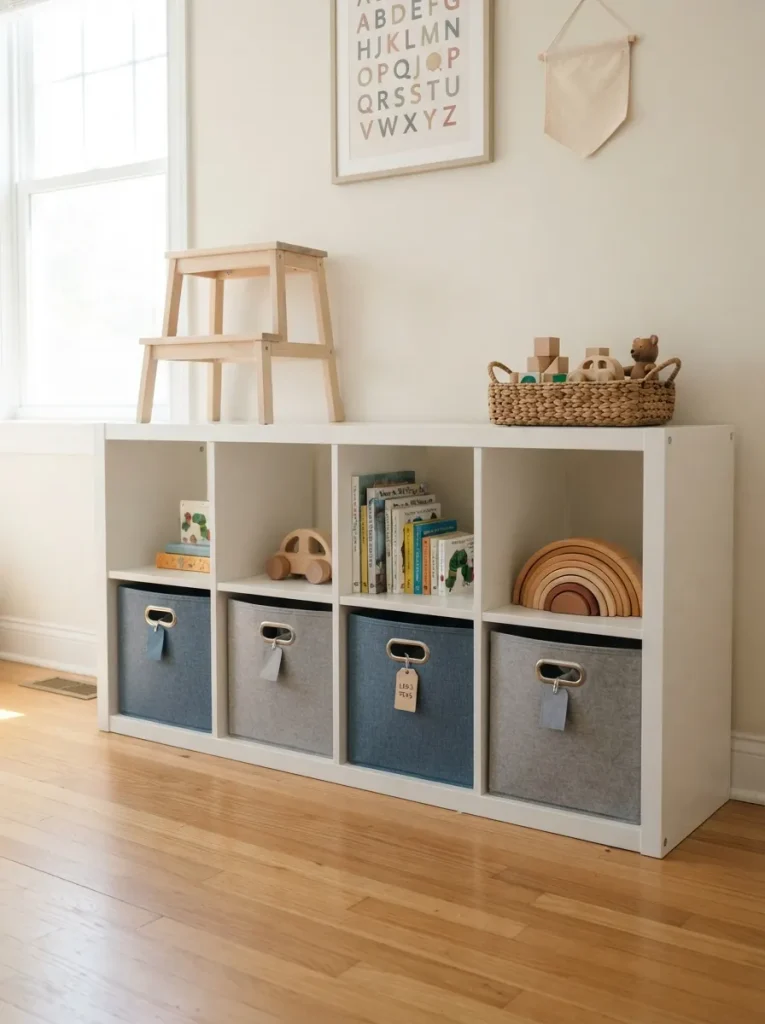
What it looks like: A 4×2 Kallax laid on its long side so every cubby sits under three feet off the ground low, wide, and within toddler reach.
Why it works: Kids under five genuinely can’t judge depth or reach above shoulder height, so a standard vertical Kallax often turns into a parent-only shelf. Laying the unit horizontal drops every cubby into a child’s working zone and skips the step-stool step entirely the same low-and-reachable logic behind other Kallax toy storage setups.
How to copy it: Use a 4×2 or 2×4 Kallax oriented so the long side runs along the floor, and anchor it to the wall with the included bracket horizontal units are more prone to tipping without it.
Best for: Parents of toddlers and preschoolers, and anyone tired of being the one who fetches every toy.
Pro Tip: Measure your child’s standing reach before buying inserts most 2–4 year-olds top out around 30 inches, which lines up almost exactly with a horizontal 4×2 unit’s top cubby.
Shop This Look
| Product |
|---|
| IKEA Kallax 4×2 shelving unit, white |
| Fabric storage bins sized for Kallax cubbies |
| Wall anchor safety strap kit |
| Small wooden step stool |
| Chalkboard label tags for bins |
2. Color-Coded Bins That End the “Everything Everywhere” Pile
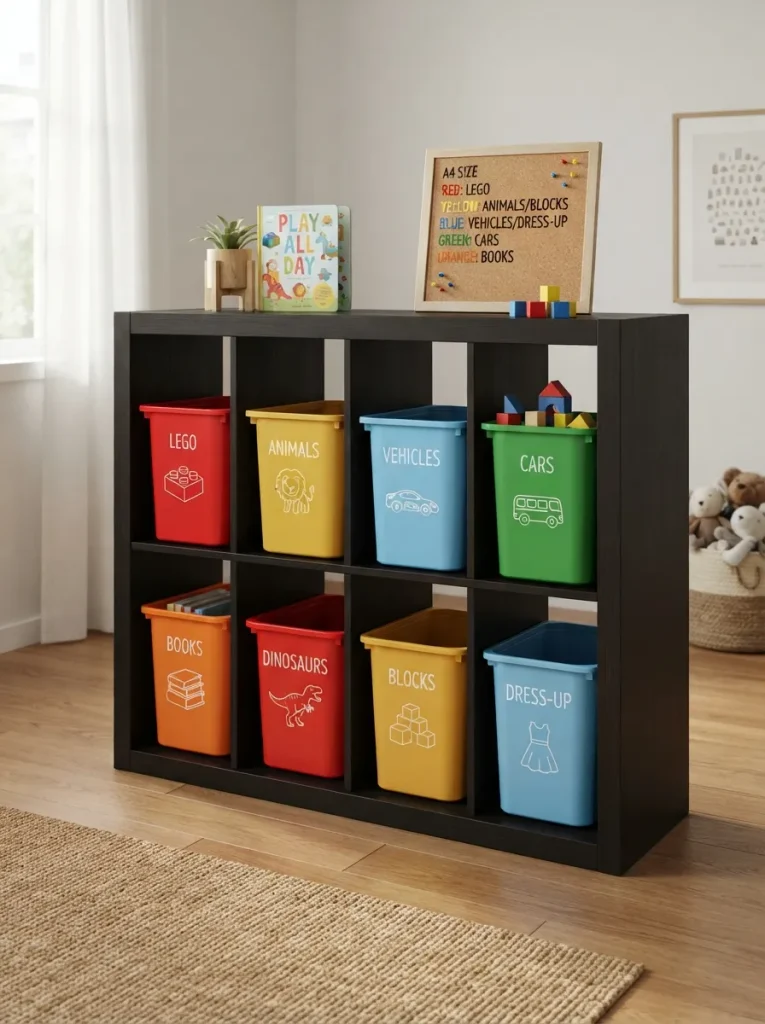
What it looks like: Five plastic bins in five different colors, each holding exactly one category of toy building blocks in red, art supplies in yellow, cars in blue.
Why it works: Color coding removes the reading requirement entirely, so even non-readers can match a toy to its home by color alone. It’s a sorting system that works before a child can spell “blocks.”
How to copy it: Assign one color per category and stick with it everywhere in the house same red bin for blocks in the playroom and the car. Consistency, not the specific colors chosen, is what makes the system stick the same principle behind most closet organization systems.
Best for: Households with multiple kids or pre-readers who need a visual system instead of text labels.
Budget Version: Skip matched retail bins entirely dollar-store plastic totes in five colors do the same job for under $25 total.
Up next: the mistake most people make with fabric bins before they even move in.
3. Fabric Bin Swap for a Quieter, Softer Playroom
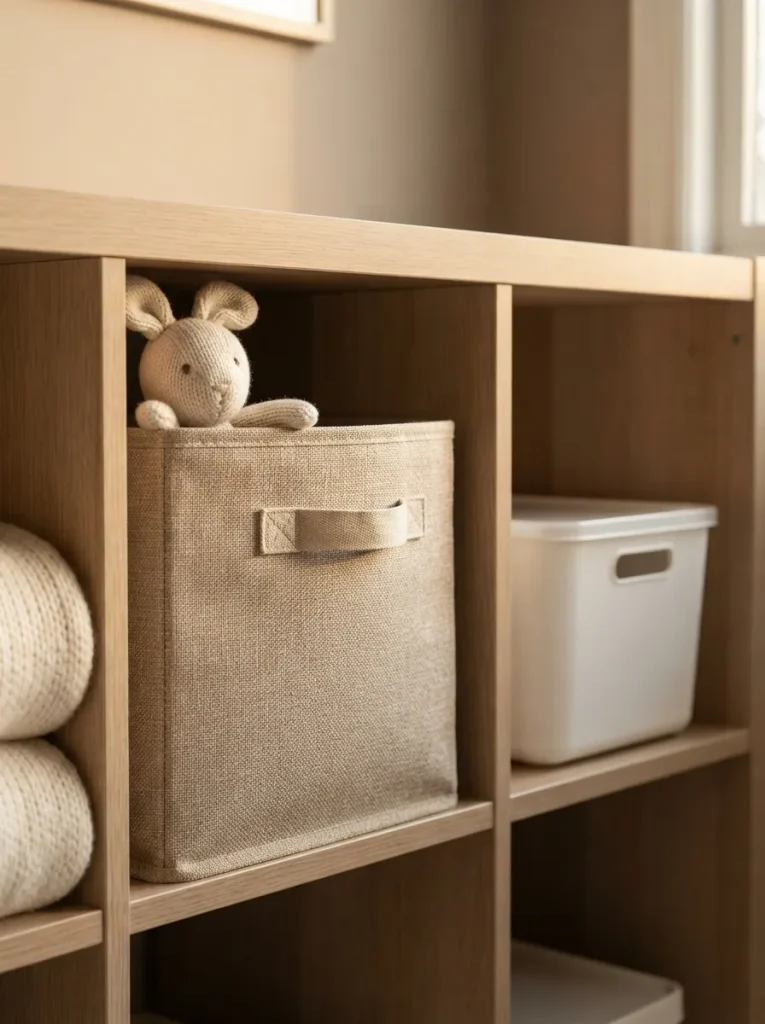
What it looks like: Woven fabric bins replace the hard plastic Kallax inserts, softening both the sound and the look of the whole wall.
Why it works: Plastic bins sliding in and out of a particleboard cubby generate real noise a scrape-and-thud that adds up over dozens of daily uses. Fabric bins with a reinforced base slide in near-silently and don’t chip the shelf edges over time.
How to copy it: Choose bins with a stiffened cardboard or plastic base insert, not floppy fabric alone floppy bins sag and lose their shape within a few months of daily toy weight.
Best for: Households where nap schedules or open-plan living mean playroom noise carries into other rooms.
Warning: Cheap all-fabric bins with no rigid base collapse under toy weight within weeks check for a stiffened bottom panel before buying, not just the fabric exterior.
4. Kallax as a Room Divider Between Play and Living Space
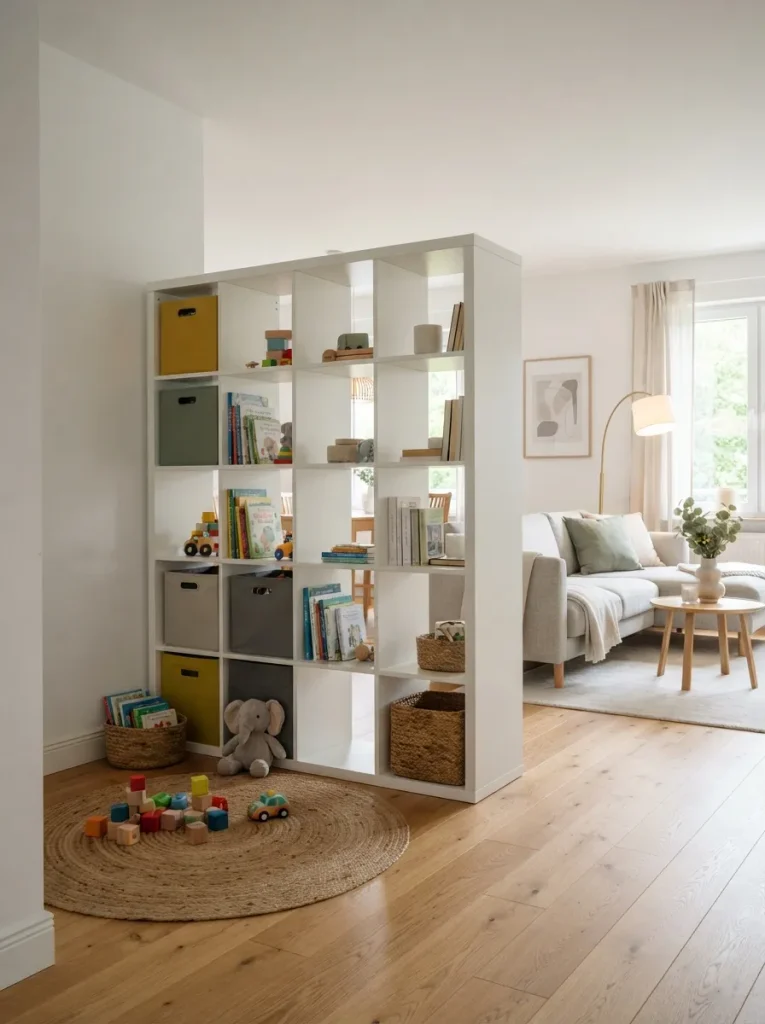
What it looks like: A freestanding Kallax unit sits perpendicular to the wall, its open back doubling as a visual boundary between the toy zone and the rest of the room.
Why it works: Open shelving keeps sightlines intact so a parent in the kitchen or living area can still see the play zone, unlike a solid divider that blocks the view entirely it’s one of the more versatile Kallax styling approaches for open floor plans.
How to copy it: Anchor the unit to the floor or an adjacent wall stud with an L-bracket before treating it as a divider freestanding units perpendicular to a wall carry higher tip risk than ones flush against it.
Best for: Open-concept homes without a dedicated playroom.
Small-Space Tip: A 2×4 unit divides a corner of a room just as effectively as a full 5×5 go smaller if the space is under 150 square feet.
5. Clear-Bin Art Station for Grab-and-Go Creativity
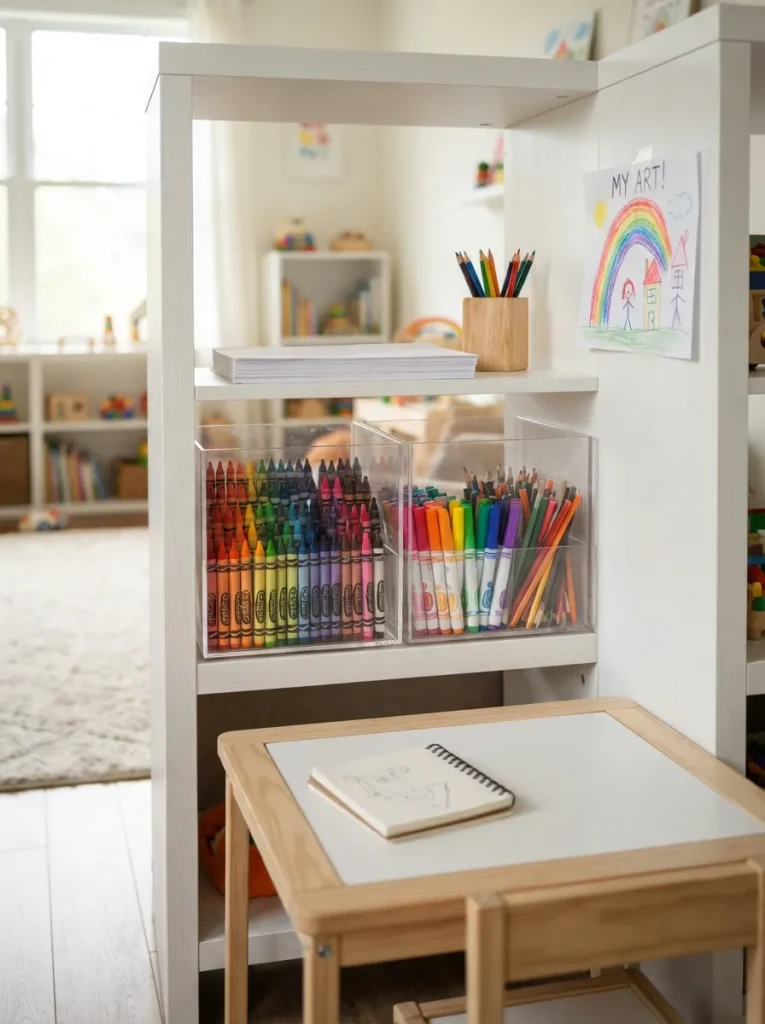
What it looks like: Clear acrylic bins replace opaque ones in two or three cubbies, turning that section into a see-through art supply station.
Why it works: Kids search less and create more when contents are visible without opening a bin transparency removes the guessing that slows down independent play.
How to copy it: Reserve the clear bins for open-ended supplies like paper and crayons, not small pieces like beads, which are easier to contain in opaque bins with lids for spill control the same sorting logic used in most craft closet setups.
Best for: Kids ages four and up who are starting to want independent craft time.
Important: Clear plastic bins show dust and crayon shavings fast plan on a quick wipe-down weekly, not monthly, if this section gets daily use.
Shop This Look
| Product |
|---|
| Clear acrylic storage bins, Kallax-cubby size |
| Washable crayon set |
| Paper roll dispenser or clipboard tray |
| Small round kids’ art table |
| Spill-proof pencil cup |
6. Chalkboard-Painted Doors for Labels That Change as They Grow
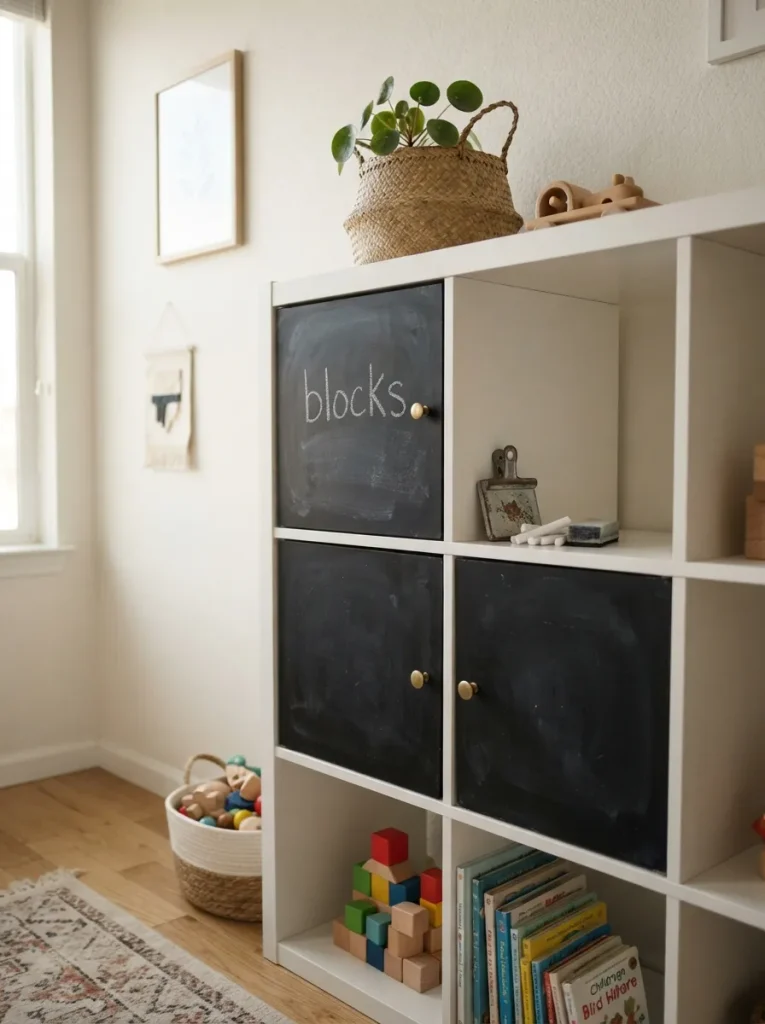
What it looks like: Two or three Kallax door inserts get a coat of chalkboard paint, turning them into relabel-anytime cubby fronts.
Why it works: Toy categories shift fast as kids grow this month’s “cars” bin becomes next year’s “art supplies” bin and a chalkboard front means the label updates in thirty seconds instead of a new printed tag.
How to copy it: Use a chalkboard spray paint rated for wood or MDF, apply two thin coats, and season the surface by rubbing chalk over the whole panel before the first real label.
Best for: Parents who don’t want to reprint labels every time toy categories change.
Quick Win: No door inserts on hand? A chalkboard contact paper sheet cut to size sticks directly to a plain door front in under five minutes.
The next idea costs almost nothing and solves the “which shelf is whose” fight between siblings.
7. Pastel Ombre Paint for Visual Wayfinding
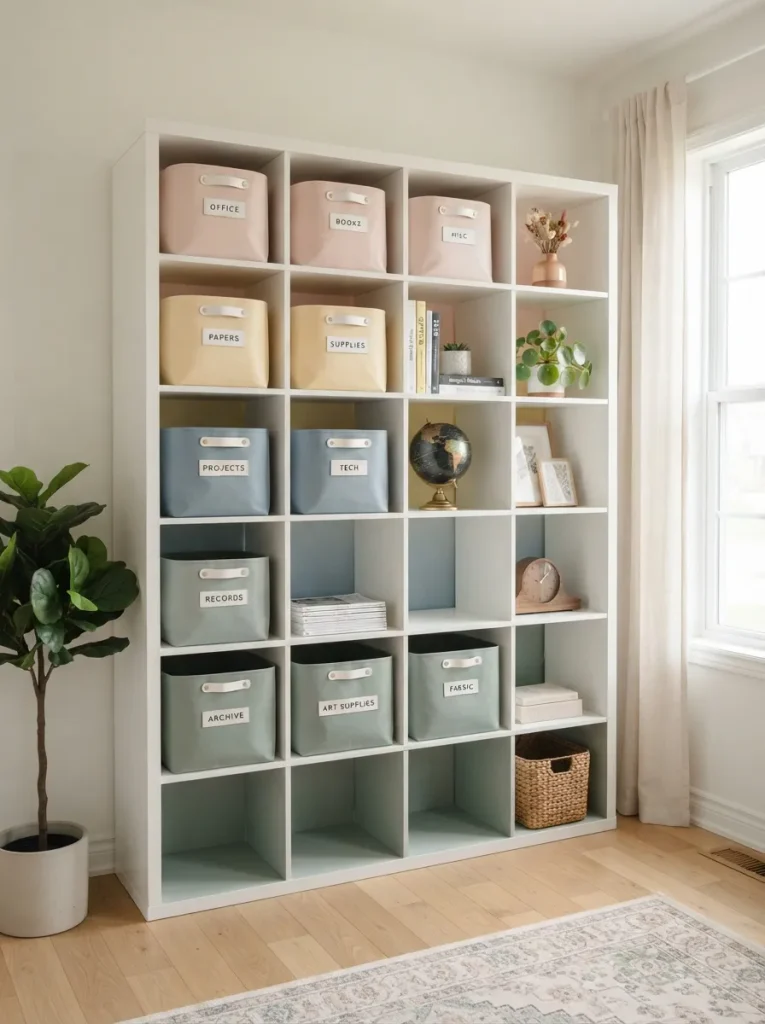
What it looks like: Each row of cubby backs is painted a slightly different pastel, blending top to bottom in a soft gradient rather than one flat color.
Why it works: A row-by-row color shift gives kids a landmark system “your toys go in the pink row” without needing to read a single label, which speeds up cleanup for siblings sharing one unit.
How to copy it: Remove the back panels if possible and paint them separately with a foam roller for an even finish, using painter’s tape between rows to keep gradient lines crisp.
Best for: Two or more kids sharing a single Kallax unit who need a fast way to claim their own section.
Pro Tip: Use a matte or eggshell finish, not gloss glossy paint on cubby backs shows every scuff from toys sliding in and out within a month.
8. Corner-Fit Kallax for Odd Playroom Angles
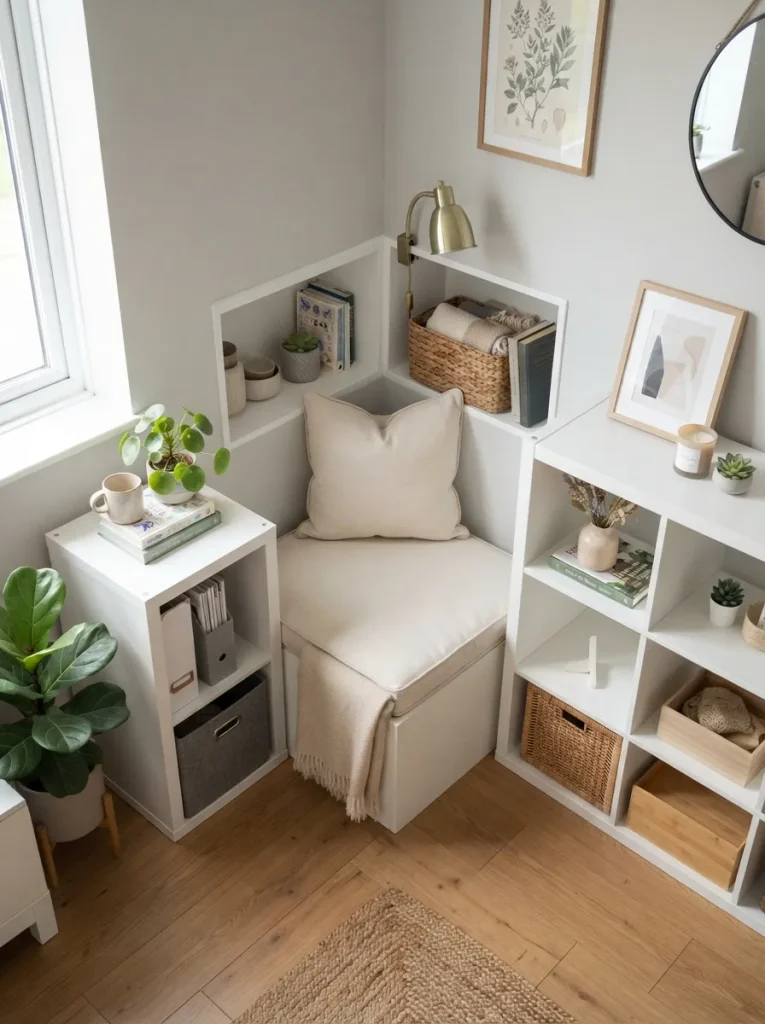
What it looks like: Two smaller Kallax units meet at a right angle in an unused corner, with a custom-cut cushion filling the triangular gap between them as a seat.
Why it works: A single large Kallax often can’t fit an oddly shaped room, but two 2×2 units angled into a corner claim wall space most furniture ignores entirely a trick that shows up often in small-room layouts generally.
How to copy it: Measure both walls of the corner separately before buying 2×2 units are easiest to angle since their smaller footprint tolerates uneven wall lengths better than a single wide unit.
Best for: Playrooms with awkward corners, sloped ceilings, or shared bedroom-playroom layouts.
✅ Before You Install a Corner Kallax:
- [ ] Measure both corner walls at floor level and again at unit height
- [ ] Check for baseboard heaters or outlets that would block flush placement
- [ ] Confirm door or window swing won’t collide with either unit
- [ ] Anchor both units to wall studs before loading any bins
Up next: a lighting trick that turns one cubby into an actual reading spot.
9. Under-Window Kallax Bench Seat
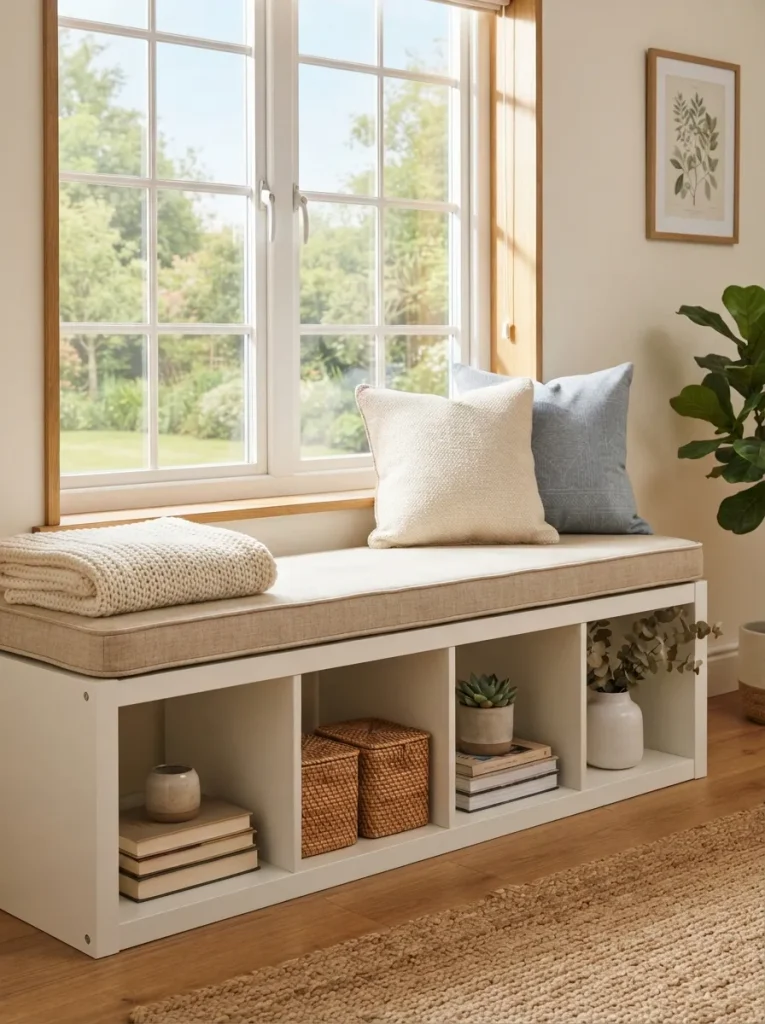
What it looks like: A low, horizontal Kallax row sits under a window with a fitted cushion on top, turning wasted under-window space into a bench and storage in one move.
Why it works: Under-window space is often dead space in a playroom layout, and a bench-height Kallax roughly 16 inches for the 1×4 puts it to work as both seating and closed storage in the same footprint.
How to copy it: Have the cushion custom-cut to the exact unit dimensions rather than buying a standard bench cushion off-the-shelf sizes rarely match Kallax depth precisely.
Best for: Rooms with a window seat opportunity and no separate reading corner.
Styling Note: A cushion with a removable, washable cover earns its keep fast in a room where snacks and markers are never far away.
Shop This Look
| Product |
|---|
| IKEA Kallax 4×1 shelving unit, white |
| Custom-cut bench cushion foam |
| Removable washable cushion cover |
| Two small accent throw pillows |
10. Under-Shelf LED Strip for a Built-In Reading Corner
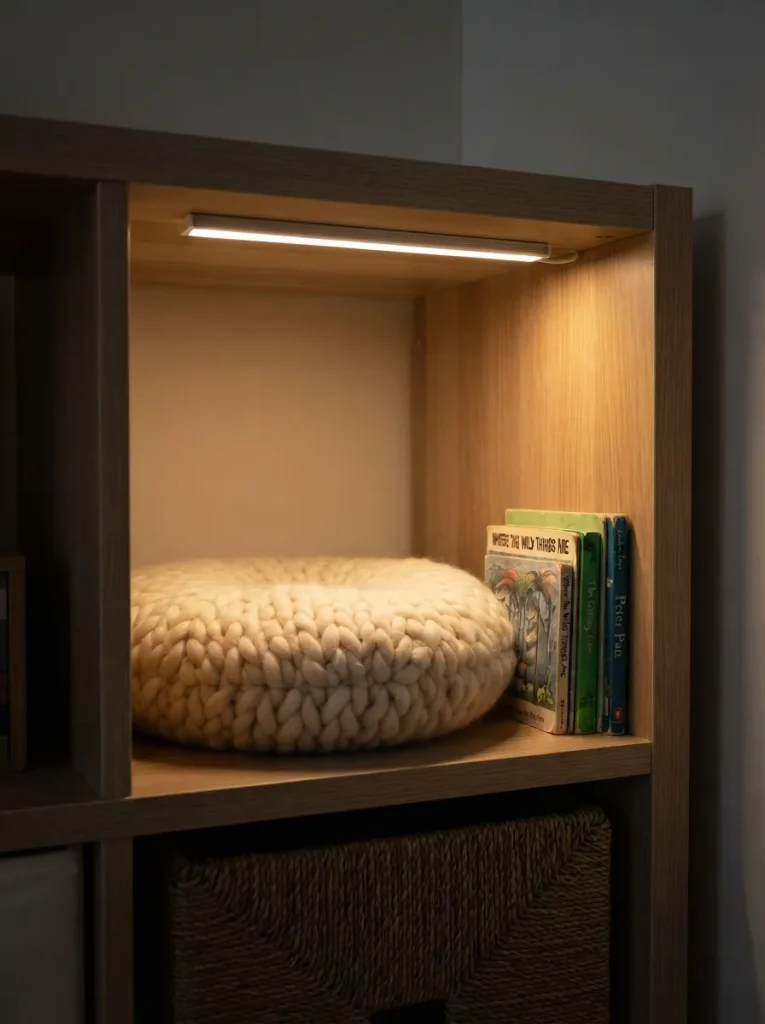
What it looks like: A warm white LED strip runs along the underside of one shelf, casting soft light down onto a cushion-filled cubby turned reading nook.
Why it works: Overhead playroom lighting is rarely aimed at a low cubby, so a dedicated strip light removes the shadow that usually makes a book corner unusable by late afternoon.
How to copy it: Choose a battery-powered or USB strip rated under 12 volts, not a mains-wired option, for a job this size it avoids running a cord across the floor entirely.
Best for: Playrooms without natural light near the reading area, or evening wind-down routines.
Important: Battery-powered strips dim noticeably after a few months of daily use check remaining brightness monthly rather than waiting for it to go dark.
My Views:
Here’s something most guides won’t tell you: the single biggest reason a Kallax storage system fails within six months isn’t the layout it’s bin count. Parents consistently buy one bin per cubby and stop, when most families with two or more kids actually need closer to 1.5 bins per cubby to leave room for overflow without things piling on top. Buy a few extra bins up front. An empty cubby is easier to fill later than a system that’s already spilling over.
11. Toy Rotation System Using a Dedicated “Off-Duty” Cubby
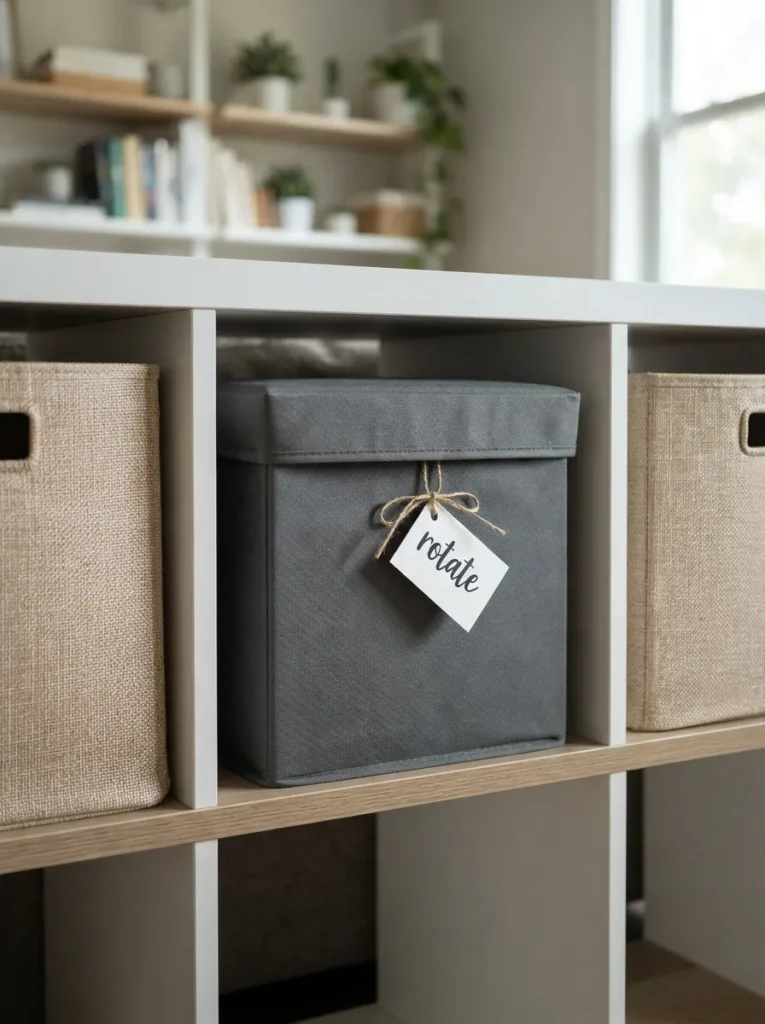
What it looks like: One lidded, opaque bin sits apart from the rest, holding toys that are temporarily out of rotation rather than in active use.
Why it works: Fewer toys visible at once genuinely reduces decision fatigue for kids and shortens cleanup time a rotation bin lets the “extra” third of the toy collection rest out of sight without leaving the house.
How to copy it: Swap the rotation bin’s contents with an active bin every two to three weeks, and let your child pick which toys go into rotation next time it turns a parenting chore into their decision.
Best for: Families with more toys than cubbies, or kids who get bored with the same options daily.
Mistake to Avoid: Rotating too many toys at once erases the novelty effect swap one bin’s worth at a time, not the whole shelf.
One more idea after this, and it’s the one that solves tight-footprint playrooms entirely.
12. Kallax as a LEGO and Dollhouse Display Wall
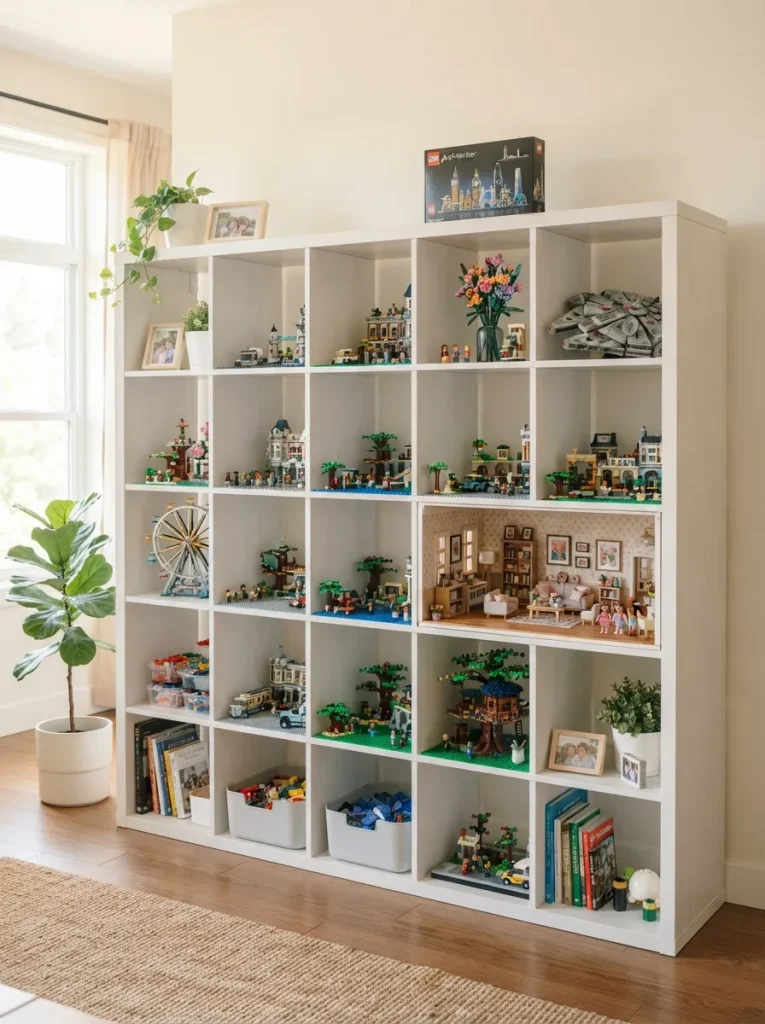
What it looks like: A few open cubbies get LEGO baseplates fixed to the shelf floor and become permanent build-and-display spots instead of storage.
Why it works: Kids who build elaborate LEGO sets often want to keep them intact rather than break them down for storage, and a dedicated display cubby ends the constant “please put it away” standoff over a finished build.
How to copy it: Use double-sided mounting squares rather than permanent glue to attach baseplates, so the cubby can revert to normal storage later without damage.
Best for: Kids ages six and up with an active building hobby, or dollhouse and miniature collections.
Pro Tip: Keep display cubbies out of the row directly under bin storage a heavy bin sliding out overhead is the fastest way to wreck a finished build.
Shop This Look
| Product |
|---|
| LEGO-compatible baseplates, Kallax-cubby size |
| Double-sided mounting squares |
| Small dollhouse furniture display set |
| Clear acrylic figurine risers |
13. String Lights Woven Through Open Cubbies
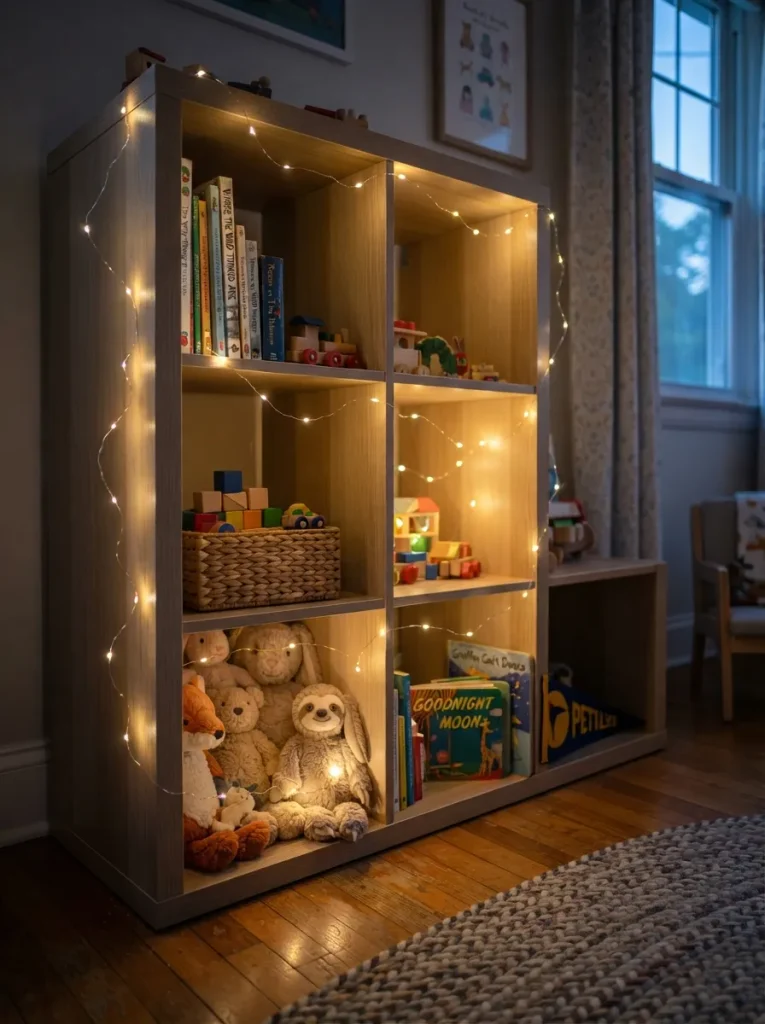
What it looks like: A single strand of warm LED string lights weaves through the open cubbies rather than sitting on top of the unit, threading light between the bins themselves.
Why it works: Playrooms often skip secondary lighting entirely, and a low-glow string light softens the space for evening wind-down without the harsh overhead brightness that signals “keep playing.”
How to copy it: Use battery or low-voltage LED strands only, and secure the cord with adhesive clips along the shelf edges so nothing dangles within reach of small hands.
Best for: Playrooms that double as an evening calm-down space before bed.
Budget Version: A single 10-foot battery LED strand runs under $15 and covers a full 5×5 unit with cord to spare.
14. Stacked Vertical Kallax for Tight-Footprint Playrooms
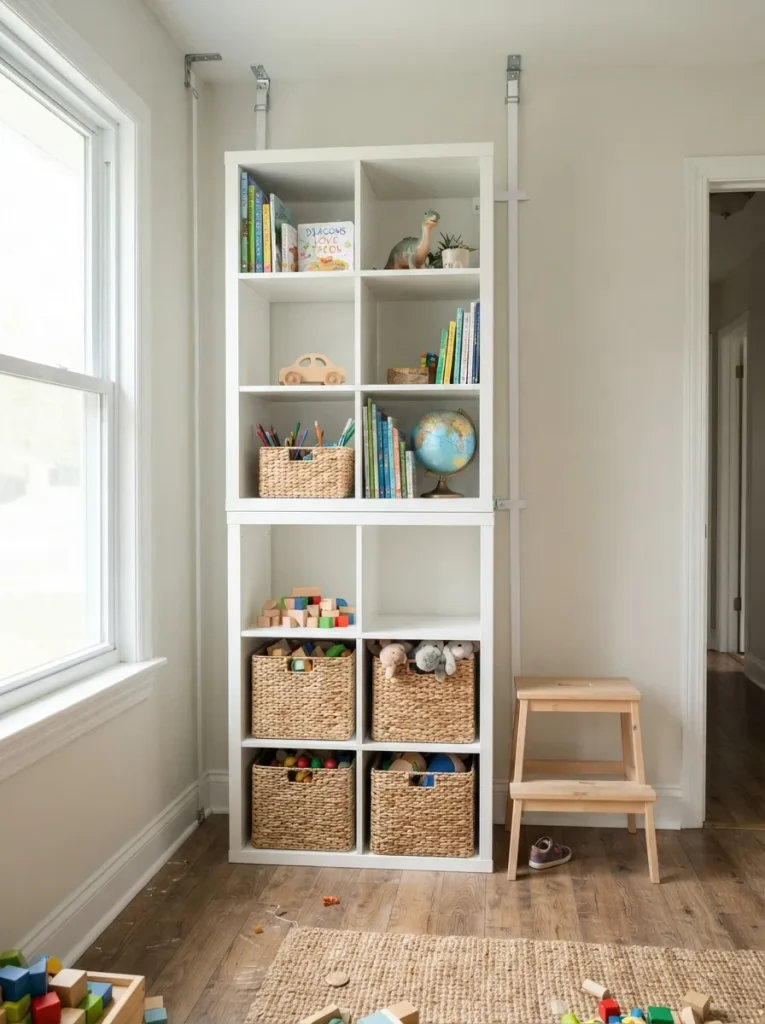
What it looks like: Two smaller Kallax units stack directly on top of each other against a narrow wall, trading floor footprint for height.
Why it works: A tight playroom often has more vertical wall space than floor space, and stacking two 2×2 units claims that height without eating into the room’s usable square footage the way a single wide unit would the same space-saving logic behind these Kallax dorm room ideas.
How to copy it: Reserve the top unit for display items and off-season toys rather than daily-use bins, since it sits above easy child reach and needs a step stool.
Best for: Small playrooms, shared bedrooms, or narrow hallway nooks with limited floor space.
Warning: Stacked units without anchor kits are a genuine tip-over risk once kids start climbing to reach the top shelf use a furniture anti-tip strap rated for the combined weight, not just the bracket that ships with one unit.
How to Start Your Kallax Playroom Transformation
In practice, the smartest first move is a single 2×4 or 4×2 Kallax turned horizontal at toddler height, loaded loosely for two weeks before buying a second unit or a full set of bins. That trial run shows exactly how your kids actually sort toys which categories overflow, which sit empty before you commit real money to a full wall.
The most common fixable mistake is buying bins before measuring the cubby opening. Kallax interior cubbies run about 13 by 13 inches, and plenty of generic storage bins are a half-inch too wide to slide in cleanly measure the actual opening, not the “fits Kallax” claim on a third-party bin’s listing.
Three items under $50 that make an immediate difference: a five-pack of fabric storage bins (around $25), a set of reusable chalkboard label tags (around $10), and a furniture anti-tip anchor strap kit (around $12) the anchor kit especially, since it’s the one item that’s genuinely non-negotiable with kids in the room.
A single unit takes an afternoon to assemble and load. A full playroom wall with bins, labels, and a rotation system realistically takes two to three weekends spread over a month, and most families keep adjusting bin categories for another month or two after that. Budget $150–$300 for one unit with inserts, or $500–$800 for a full multi-unit wall with bench seating and lighting.
Ready to Create Your Dream Playroom?
Between the color-coded bins, the fabric swaps, the corner-fit units, and the under-shelf lighting, there’s more than one way to make a Kallax wall actually work for how your kids play you don’t need all fourteen ideas to see a difference.
Start with just one change, even something as small as swapping in labeled bins, and let the rest follow once you see what your kids actually use. Today, that could be as simple as measuring your cubby openings before you order a single bin.
A system built around how your kids really sort things means less searching, less stepping on stray pieces, and a cleanup routine that doesn’t end in a fight. Save the ideas that fit your space now a stacked vertical unit or a bench seat might make more sense once the room changes shape next year.
More Ideas You’ll Love
- 12 IKEA Kallax Kids’ Bedroom Storage Ideas for Every Age
- 9 Small Playroom Organization Ideas That Don’t Need a Big Budget
- 10 Toy Rotation System Ideas That Actually Cut Down on Clutter