15 Halloween Themed Craft Night Ideas for a Spooktacular Night In
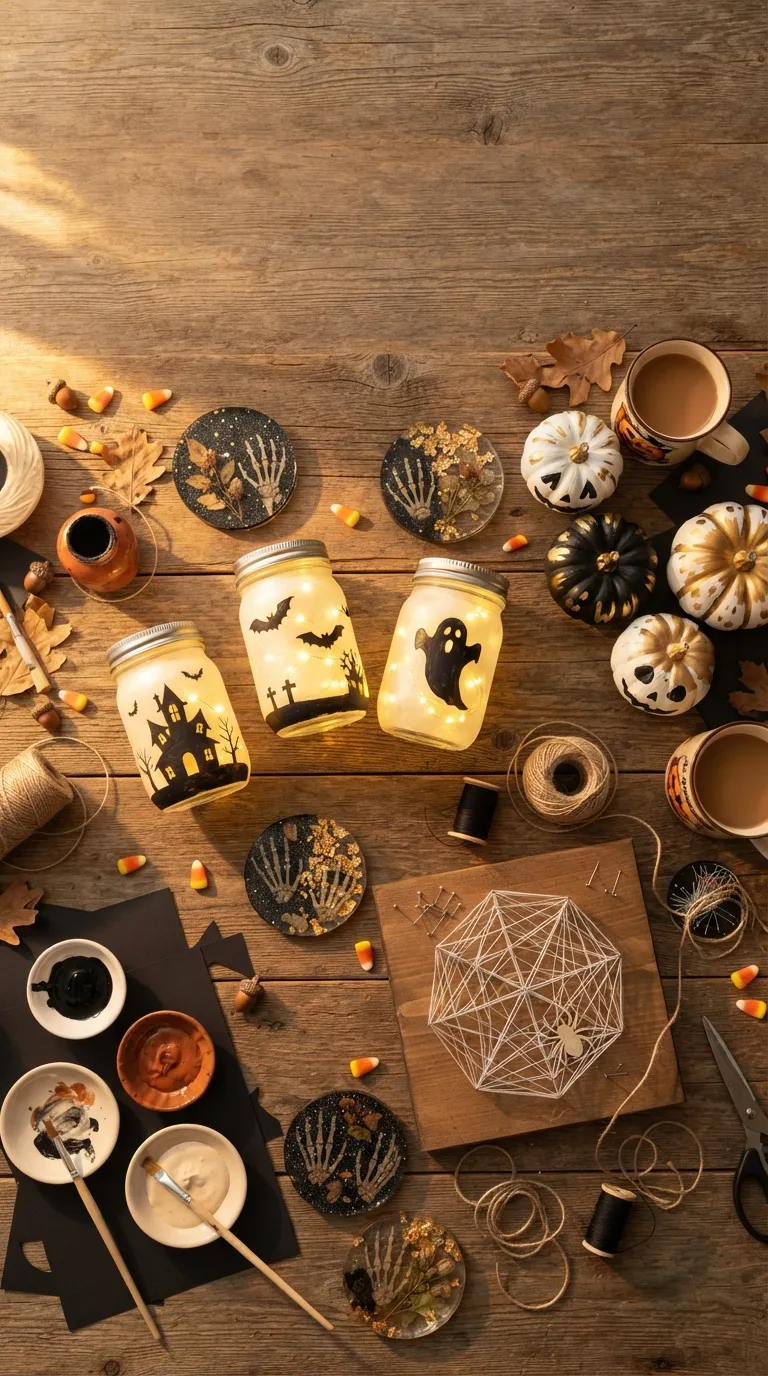
A Halloween craft night is a few friends, a table covered in butcher paper, and enough hot glue to regret by morning — and it’s one of the easiest parties to throw well. Here are 15 ideas, from five-minute wine glass wraps to a full resin coaster bar, built to fill a folding table without emptying a wallet.
There’s a specific kind of good chaos to it string lights humming, cider going lukewarm in someone’s hand, glitter that’ll turn up in the car seat in March. Someone always ends up better at glue-gunning than they expected. Nobody’s phone comes out until the photos at the end. That’s the appeal, honestly.
Quick Navigation
- Why Halloween Themed Craft Nights Make Such a Difference
- The 15 Craft Night Ideas
- How to Start Your Halloween Craft Night
- Ready to Host Your Dream Halloween Craft Night?
Why Halloween Themed Craft Nights Make Such a Difference
A themed craft night works because it gives people something to do with their hands instead of standing around a snack table making small talk. It comes out of the same DIY-social wave that made paint-and-sip nights popular, just cheaper and messier.
The best supplies are things you can find at any craft store or grocery checkout mason jars, cardstock, acrylic paint, dollar-store candles nothing that needs a special order. It works in small apartments too, as long as you protect the table and plan for drying time; the biggest first decision is picking two or three crafts, not ten, so nobody’s overwhelmed by choice.
| Best starting point | Pick 2–3 crafts, not all 15 |
| Biggest impact area | Lighting + table setup |
| Budget to start | $40–$90 for 6–8 guests |
| Time to complete | 2.5–3 hour gathering |
The 15 Craft Night Ideas
1. Silhouette Story Jars
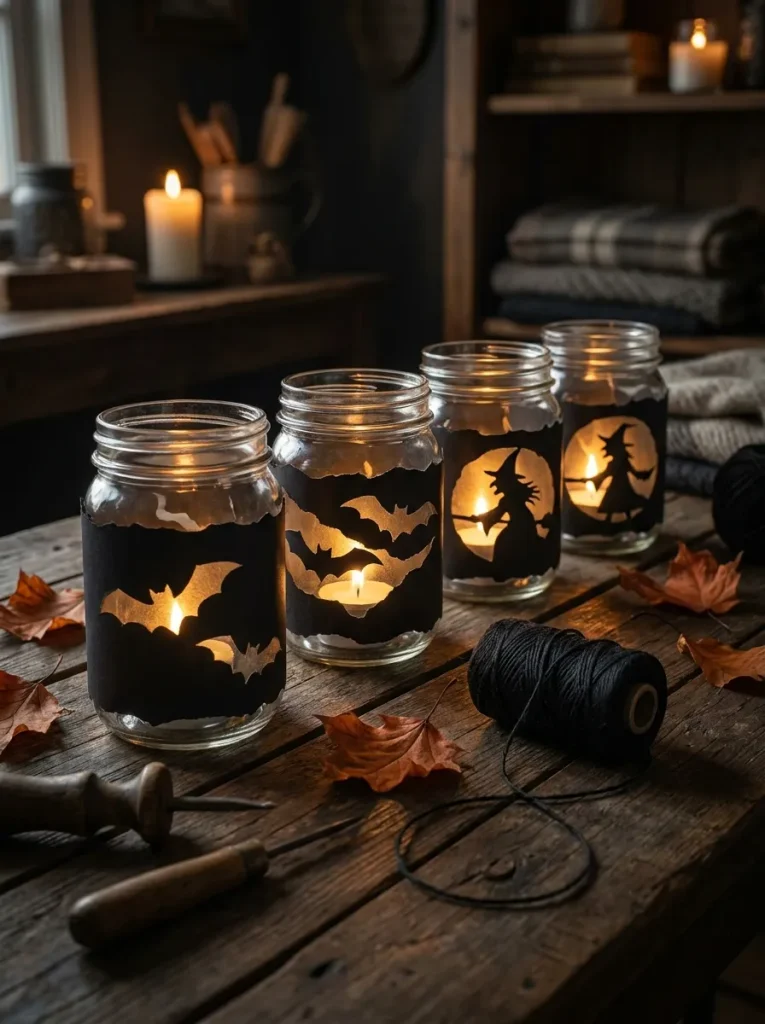
What it looks like: Rows of jars throwing bat- and witch-shaped shadows across the tablecloth, hushed and flickering.
Why it works: Silhouette cutouts use negative space instead of detail, so even a shaky hand produces a clean shadow the light does the actual design work.
How to copy it: Trace a free bat or cat template onto black cardstock, cut with a craft knife, and wrap around a mason jar with the seam taped in back. Use battery tealights only.
Best for: Beginners and anyone hosting with kids in the room.
Pro Tip: Score the paper lightly before cutting tight curves like a bat’s wing tip or the cardstock tears instead of cutting clean.
What You’ll Need
| Product |
|---|
| Black cardstock paper pack |
| Craft knife and self-healing cutting mat |
| Flameless battery tealights, warm white |
| Wide-mouth mason jars, 16 oz |
| Twine or raffia for wrapping |
2. Mummy Wine Glass Wraps
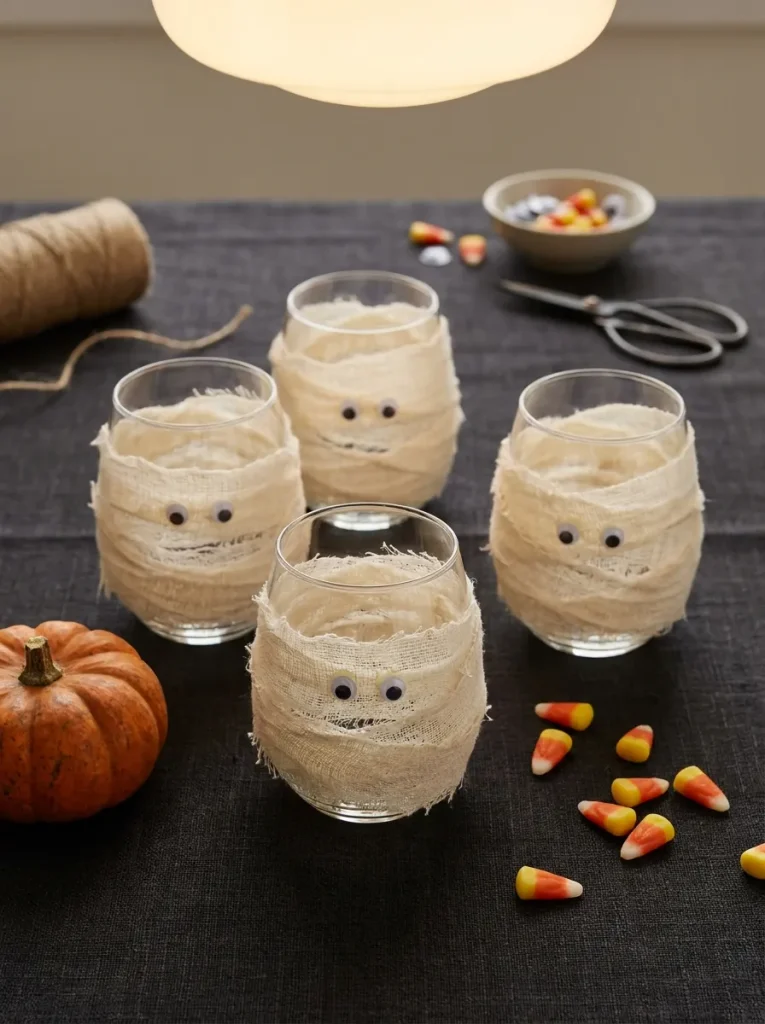
What it looks like: Plain glasses turned into grinning mummies with a few strips of gauze and two crooked eyes.
Why it works: It’s a five-minute craft with an immediate, obvious result instant payoff keeps momentum going early in the night, before anyone’s committed to a longer project, and it slots naturally alongside other Halloween decor ideas already on the table.
How to copy it: Wrap self-adhesive gauze bandage loosely around a stemless glass, leaving gaps, and press on two googly eyes with craft glue. Skip regular gauze it won’t stick without extra tape.
Best for: Anyone hosting a drop-in style party with guests arriving at different times.
Budget Version: Buy first-aid gauze rolls instead of Halloween-branded ones same texture, a fraction of the price, and no one can tell the difference once it’s wrapped.
3. Mini Pumpkin Paint Bar
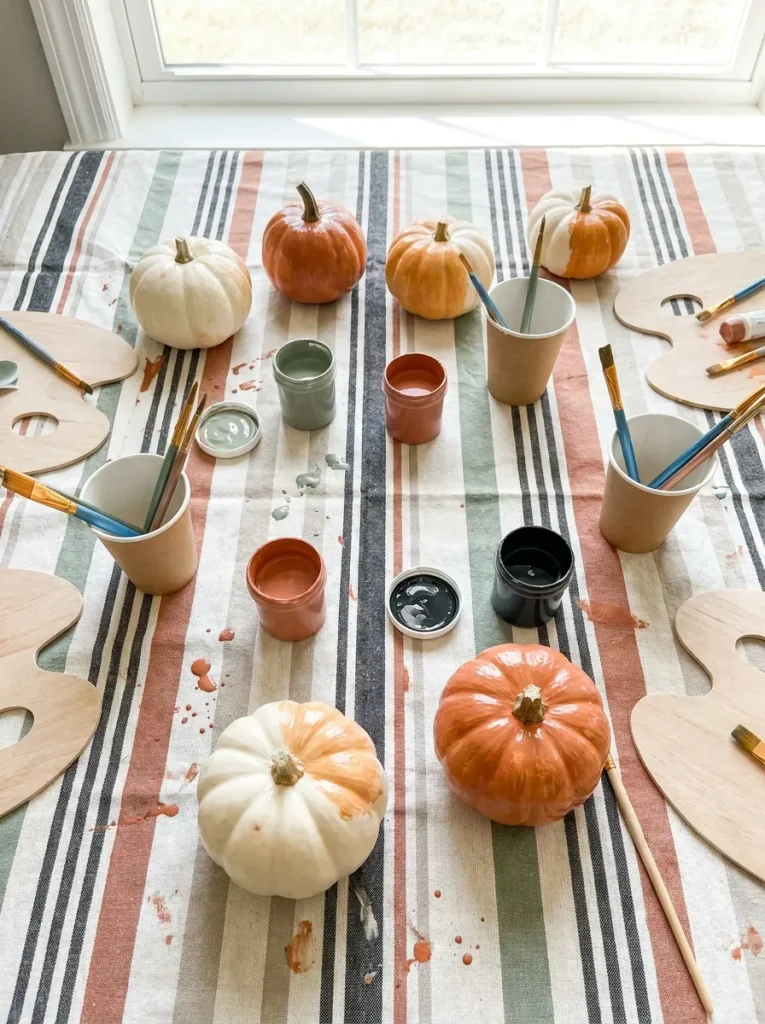
What it looks like: A cluster of mini pumpkins mid-transformation into ghosts, skulls, and abstract drip patterns.
Why it works: Foam or resin faux pumpkins remove the time pressure of a real pumpkin softening on the table, so people can keep working past when a fresh one would already be sweating.
How to copy it: Set out foam pumpkins, acrylic paint pots, and paint pens for detail work paint pens are what actually let people draw faces instead of just blocking in color.
Best for: Guests who want a keepsake craft to take home.
Warning: Real pumpkins painted with acrylic and left out for hours will sweat and cause the paint to bead or peel by the next morning use foam or plastic pumpkins if the piece needs to survive past the party.
What You’ll Need
| Product |
|---|
| Foam craft pumpkins, assorted sizes |
| Acrylic paint set, matte finish |
| Fine-tip paint pens |
| Foam brushes, variety pack |
| Plastic table drop cloth |
The next idea costs almost nothing and uses supplies most people already have in a junk drawer.
4. Candy Corn Color-Block Tablescape
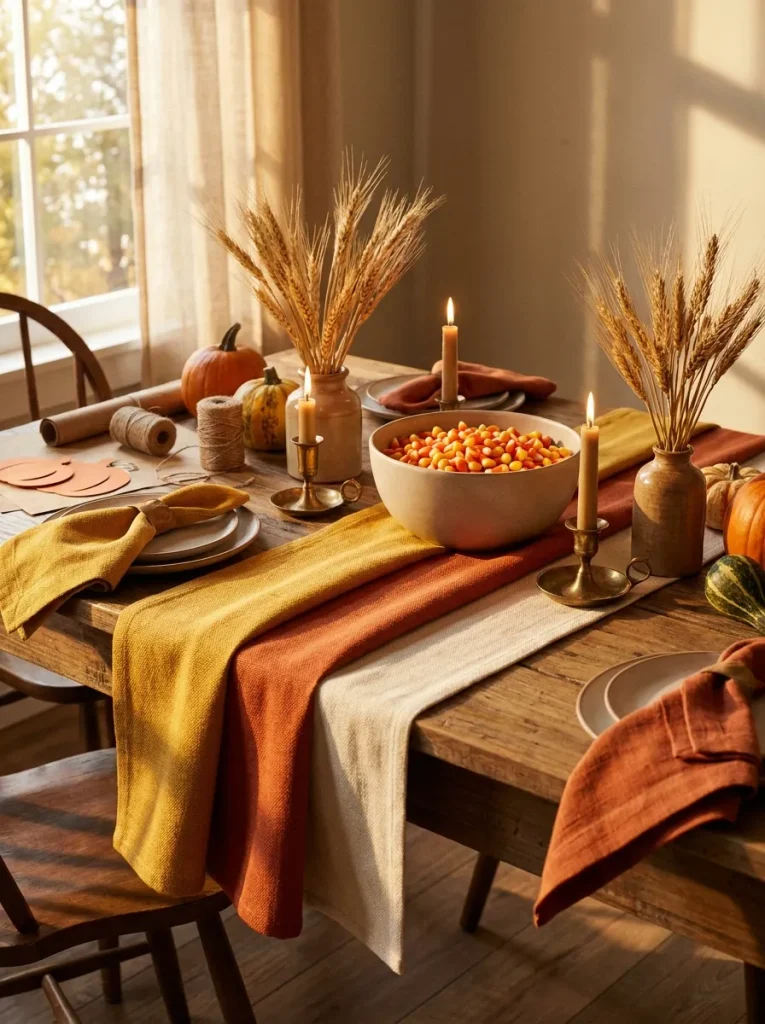
What it looks like: A table striped in candy corn’s own yellow-orange-cream gradient, dead simple and oddly satisfying.
Why it works: Pulling a palette straight from a familiar object instead of picking colors from scratch removes the guesswork and still reads as intentional.
How to copy it: Layer a cream tablecloth, orange runner, and yellow napkins in that stacking order, then repeat the same three tones in the centerpiece so the eye reads it as one system.
Best for: Hosts who want the room to photograph well without extra decorating.
Styling Note: Skip a matching centerpiece vase and use a plain white bowl instead the color story is stronger when it isn’t fighting a patterned container.
5. Spider Web String Art Boards
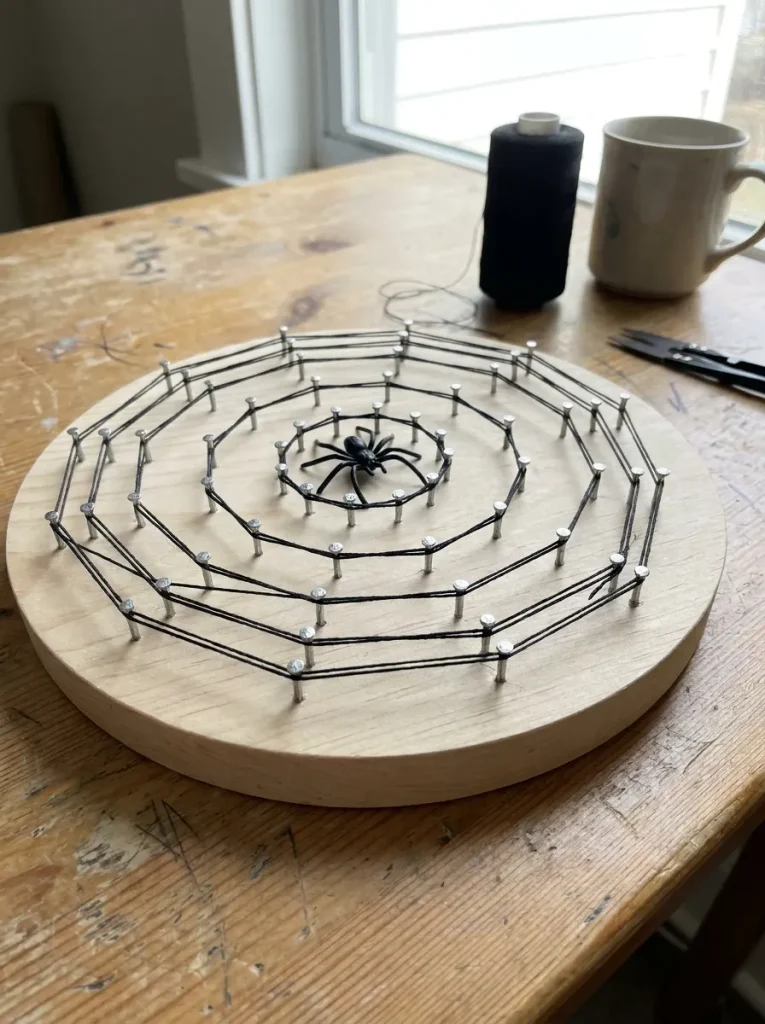
What it looks like: A raw wood circle strung with black thread radiating out from a center point into a web.
Why it works: String art relies on repetition and even spacing rather than drawing skill, so the pattern looks deliberate even from someone who’s never done a craft like it before.
How to copy it: Pre-hammer nails in a spiral pattern before guests arrive, then have people wrap embroidery thread nail to nail in a star pattern pre-placing the nails is what saves the most time on the actual night.
Best for: Guests who like a slower, more meditative project.
Important: Craft store balsa or pine rounds split more easily than they look like they will pre-drill a starter hole at each nail point instead of hammering straight into raw wood.
6. Craft Table Zoning for a Crowd
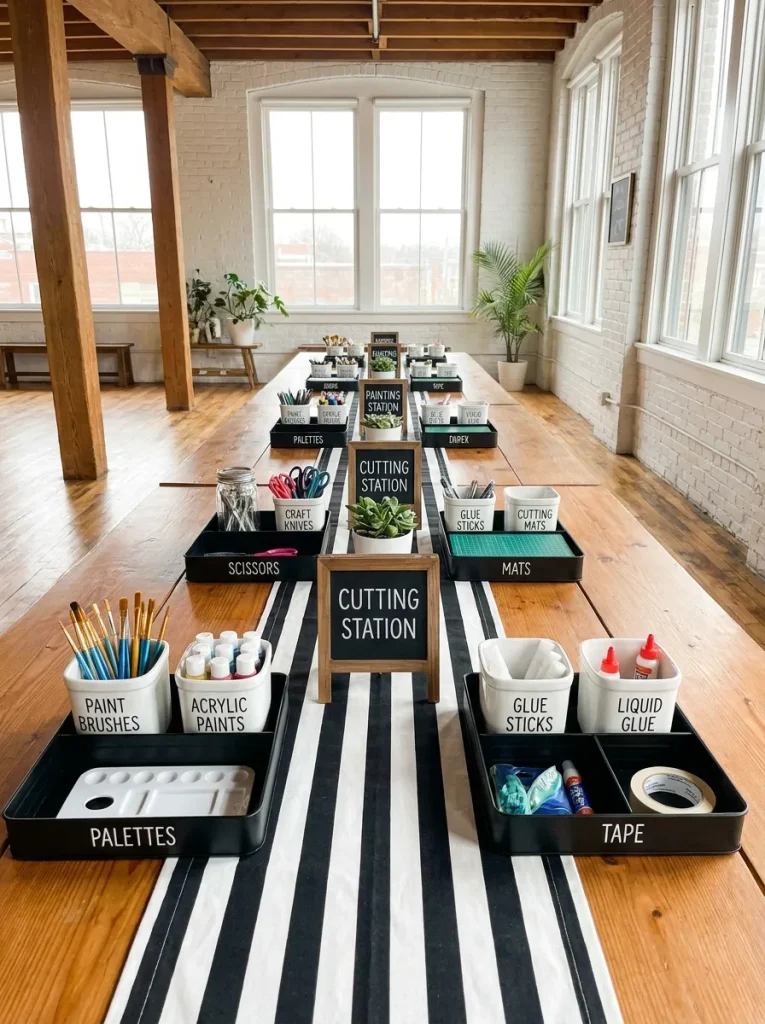
What it looks like: One long table split into three visible sections instead of a single shared pile of supplies.
Why it works: Zoning solves the real bottleneck at craft nights everyone reaching for the same scissors at once by giving each station its own dedicated tools instead of one shared set, a detail worth building into your craft night themes planning from the start.
How to copy it: Split a six-foot table into three zones with a small chalkboard sign at each, and duplicate cheap tools like scissors and glue sticks across all three so nobody’s waiting.
Best for: Groups of six or more where one table is doing double duty.
Mistake to Avoid: People assume one pair of scissors per craft is enough past four or five guests, buy a second cheap pair rather than let a bottleneck slow the whole table down.
Up next: the idea most people save for last, when it actually works better set up before anyone else arrives.
7. Bat-and-Cat Paper Garland
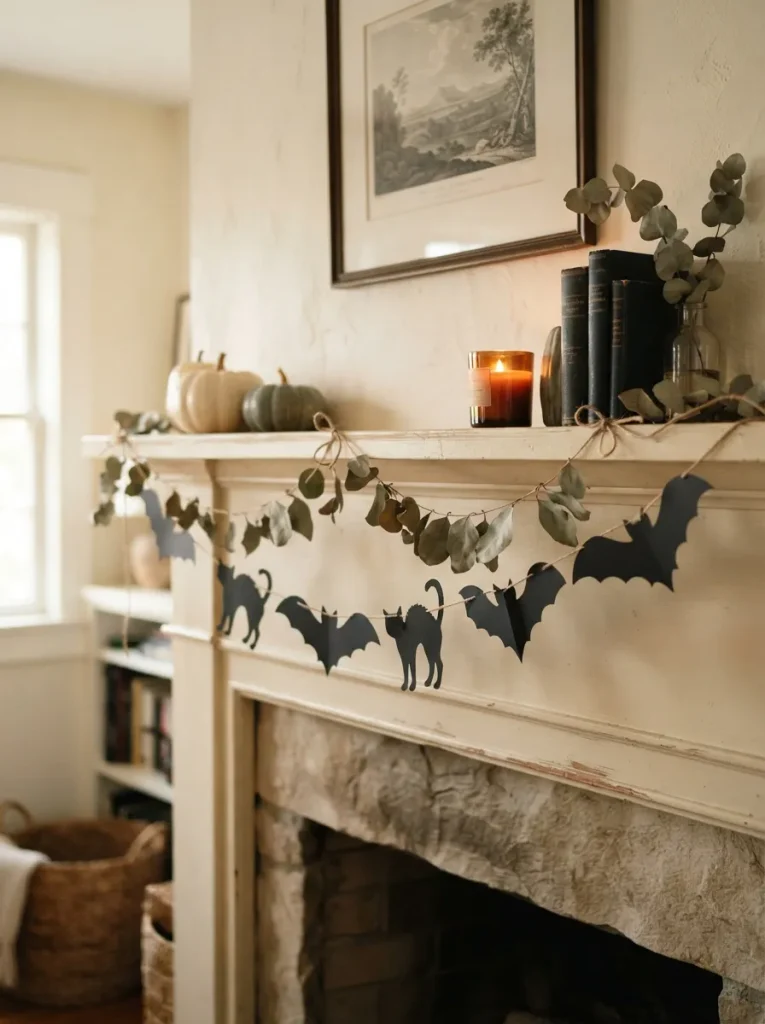
What it looks like: A simple strand of black silhouettes strung along twine, low-effort and genuinely decorative once it’s up.
Why it works: A garland reads as finished decor rather than a craft-table leftover, because it’s displayed off the table at eye level instead of stacked in a pile with everything else made that night the kind of payoff that makes it worth browsing more easy paper craft ideas beyond Halloween.
How to copy it: Punch a small hole in the top of each paper cutout with a standard hole punch, thread them onto twine at even spacing, and hang before the paint bar starts so it’s already drying.
Best for: Guests who want to see their craft used immediately, not boxed up to take home.
Quick Win: Pre-cut extra silhouettes ahead of time garland-making goes twice as fast when people are just threading, not also cutting.
8. Glow-in-the-Dark Ghost Jars
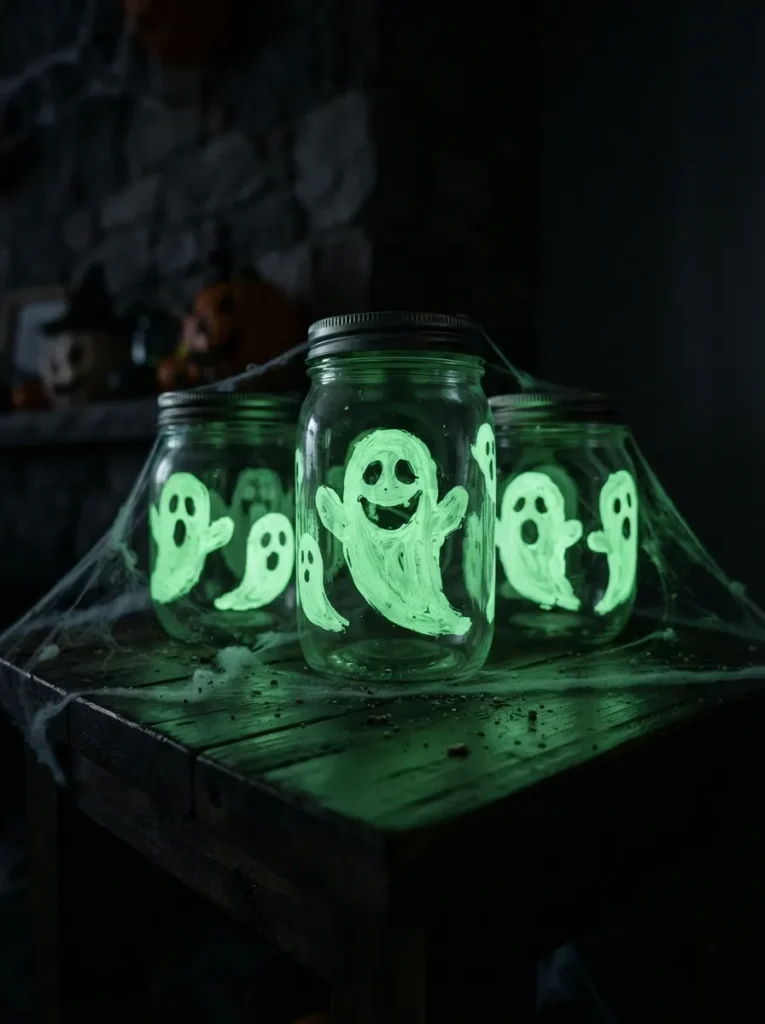
What it looks like: Plain jars that look ordinary in daylight and turn into glowing ghosts once the lights go down.
Why it works: The reveal happens later in the night, which gives the craft a second moment instead of being done and forgotten the second it’s finished.
How to copy it: Paint ghost shapes on jars with glow-in-the-dark acrylic paint, then “charge” them under a bright lamp or phone flashlight for a few minutes before the room goes dark.
Best for: A craft night that runs into the evening rather than an afternoon event.
Pro Tip: Glow paint needs direct light exposure to charge a jar left in a dim corner won’t glow nearly as bright as one set under a lamp for five minutes first.
What You’ll Need
| Product |
|---|
| Glow-in-the-dark acrylic paint |
| Clear glass mason jars |
| Fine round craft brushes |
| Battery-powered puck light for charging |
9. Jewel-Tone Gothic Table Runner
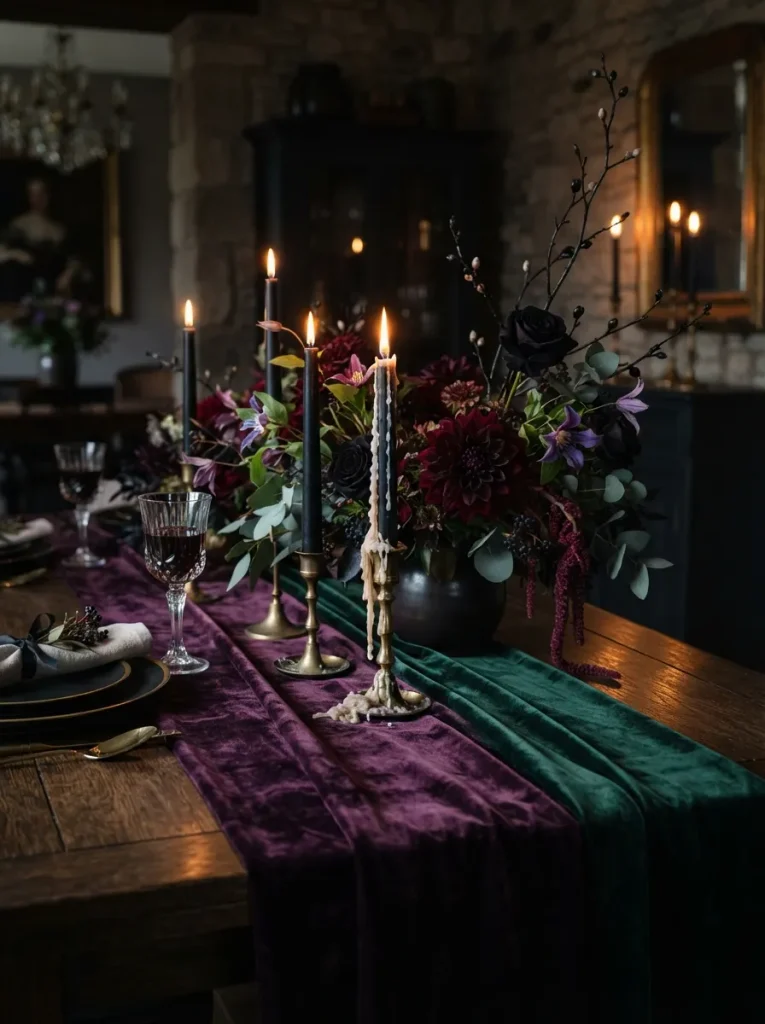
What it looks like: A moodier alternative to orange-and-black, built from plum, emerald, and near-black tones instead.
Why it works: Jewel tones read as intentional and grown-up rather than costume-like, which matters if the same table needs to double as an elegant dining room setup once the crafting wraps.
How to copy it: Layer a plain velvet or matte runner in deep purple, then add black taper candles and one dark floral bunch dahlias or mums both hold their color under low light.
Best for: Adult-only gatherings that want less “kids’ party,” more dinner-party edge.
Styling Note: Mismatched candle heights read as more deliberate than a matched set vary two or three taper heights along the runner instead of lining them up even.
The next few ideas are where the party turns into keepsakes starting with the one worth planning a whole weekend around.
10. Resin Halloween Coaster Pours
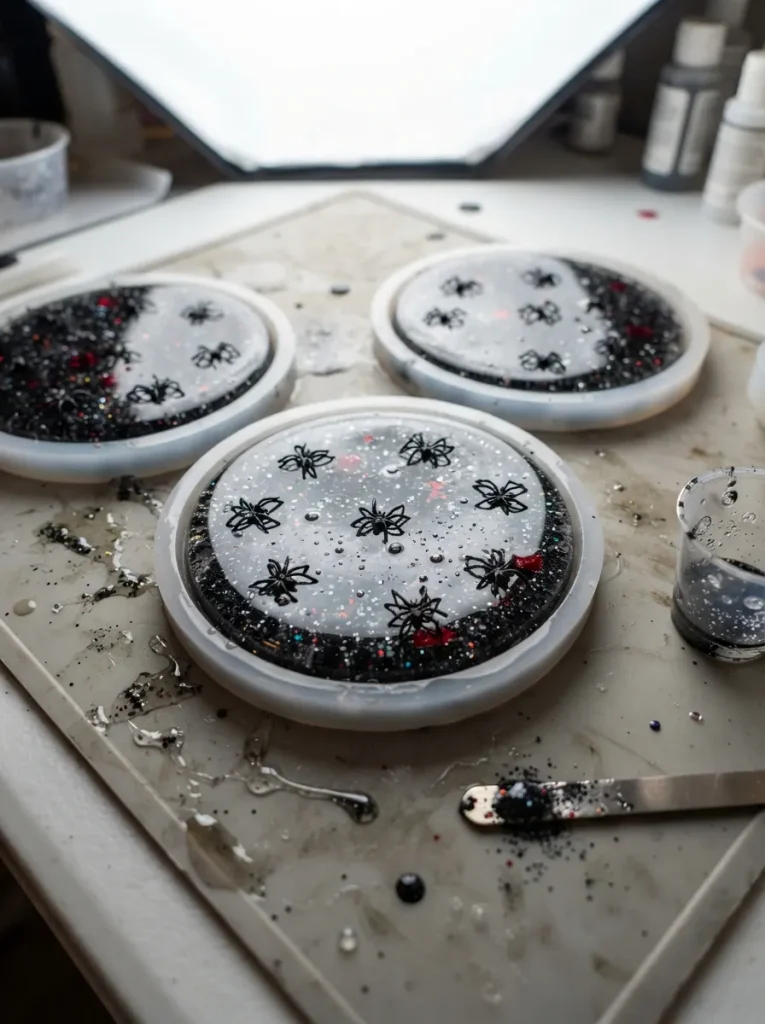
What it looks like: Glassy round coasters with a spider or a scatter of black glitter frozen inside.
Why it works: Resin’s glossy finish makes even a simple mix-in look expensive, and the mold does most of the shaping work the craft is really about the pour ratio, not artistic skill.
How to copy it: Mix resin and hardener at the exact ratio on the bottle, stir slowly to avoid bubbles, and drop in mix-ins before pouring into silicone coaster molds.
Best for: Guests who don’t mind a craft with an overnight wait for the payoff.
✅ Resin Pour Setup:
- [ ] Cover the table with plastic sheeting before opening any resin
- [ ] Measure resin and hardener by volume, not by eye
- [ ] Stir for the full time listed on the bottle, scraping the sides
- [ ] Add mix-ins and pour into molds within the working time window
- [ ] Cover loosely and leave undisturbed for the full cure time
What You’ll Need
| Product |
|---|
| Clear casting resin kit |
| Silicone coaster molds |
| Mixing cups and stir sticks |
| Small plastic spiders or black glitter |
| Plastic table sheeting |
11. DIY Photo Booth Backdrop
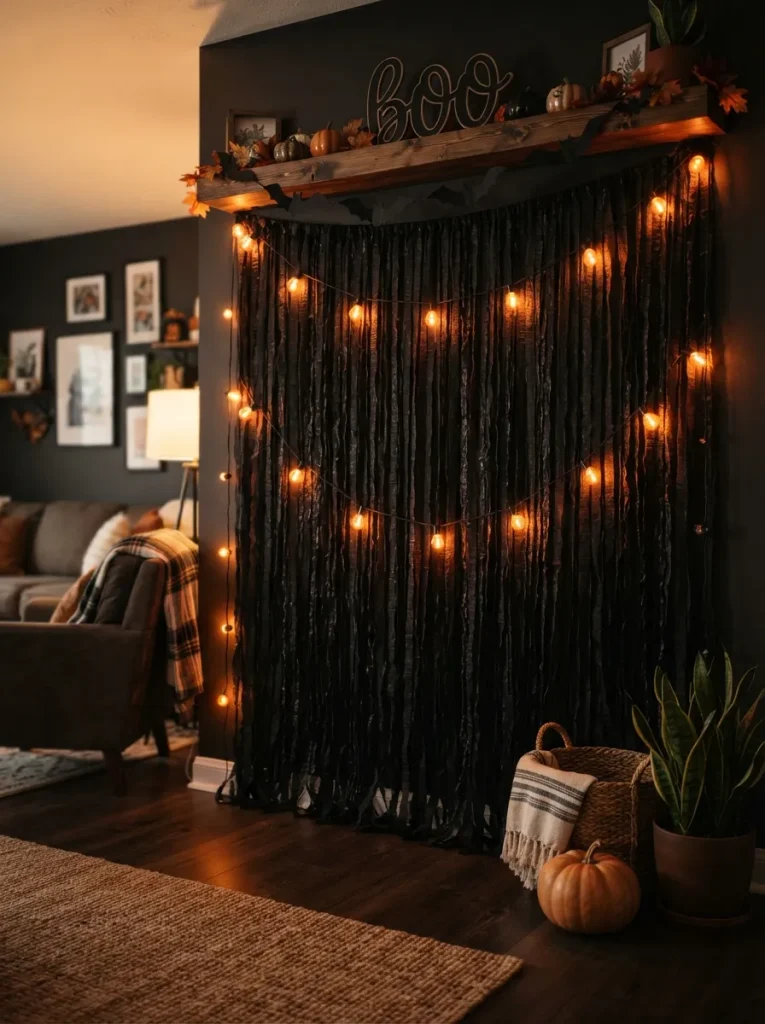
What it looks like: A fringe paper wall strung with warm lights, tucked into a corner as its own little scene.
Why it works: A dedicated backdrop gives the night a natural closing activity, and it separates “the mess” from “the photo,” which matters once glue and paint are involved.
How to copy it: Hang black metallic fringe paper from a tension rod, weave a warm-white string light through it at chest height, and prop a single wood sign against the base.
Best for: Hosts who want built-in content for the group chat afterward.
Quick Win: A tension curtain rod holds fringe paper without any wall damage no nails, no Command strips, and it comes down in under a minute after the party.
My Views:
In my experience, the craft that photographs best is never the one that took longest a five-minute mummy glass beats a two-hour resin pour in every group photo, because it’s finished and in someone’s hand instead of still curing on a shelf. Plan the party’s photo moment around what’s actually done by 9 p.m., not what looks most impressive on paper.
12. Apothecary Label Bar for Mystery Bottles
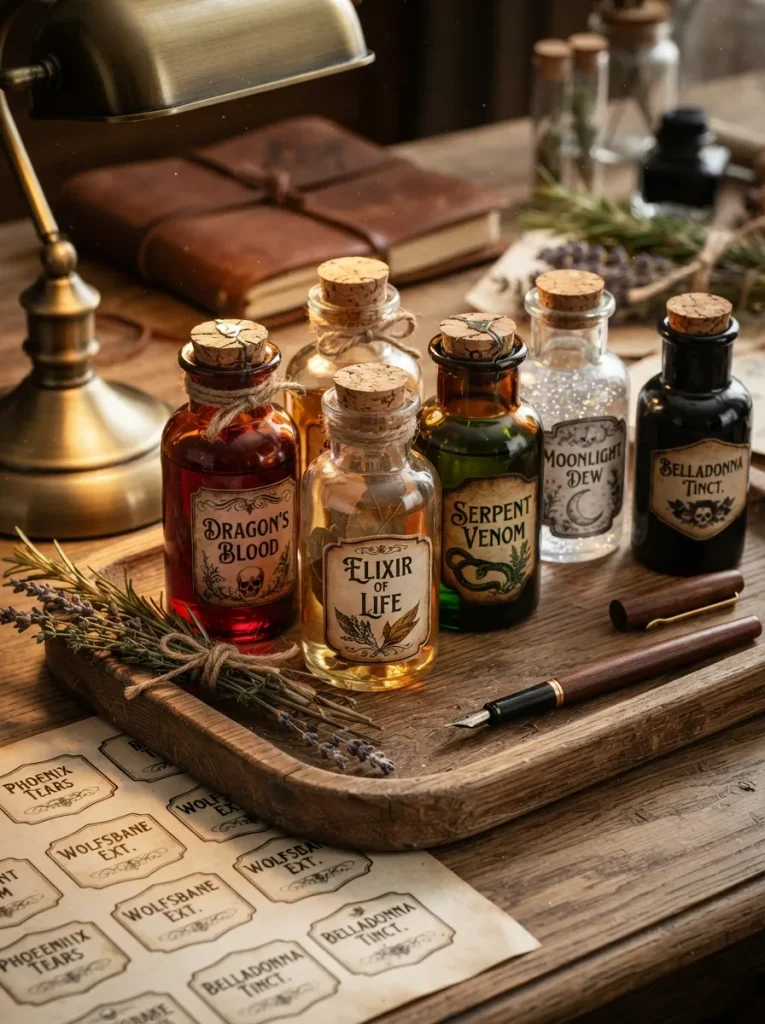
What it looks like: Small corked bottles dressed up with printed labels that read like something from a witch’s shelf.
Why it works: Printable labels remove drawing skill from the equation entirely the craft is cutting, gluing, and choosing a potion name, which keeps it accessible for guests who don’t consider themselves “the crafty one.”
How to copy it: Print a free apothecary label sheet on cream cardstock, cut labels to size, and wrap them around small glass bottles filled with colored water or dry herbs.
Best for: Guests who enjoy a bit of writing or naming over hands-on assembly.
Important: Regular printer paper labels wrinkle almost immediately once wrapped around a curved bottle cardstock or a matte label sticker sheet holds its shape far better.
Three ideas left, and the last one doubles as the party favor everyone actually takes home.
13. Small Apartment Craft Corner Setup
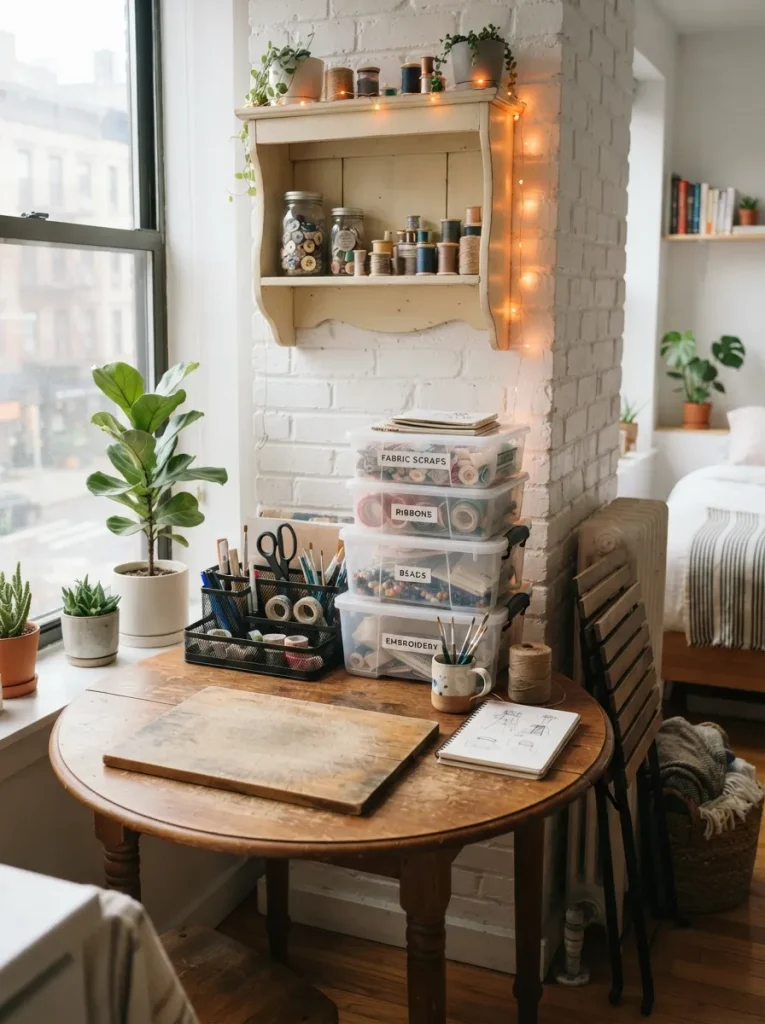
What it looks like: A single round table doing the job of a long folding table, with supplies stacked instead of spread out.
Why it works: Vertical storage stacked bins instead of one flat spread of supplies frees up the actual working surface, which matters far more in a small space than in a house with a spare craft room to spread out in.
How to copy it: Use two or three stackable clear bins sorted by craft instead of laying every supply out at once, and hand bins to guests as they finish one project and move to the next.
Best for: Studio and one-bedroom apartment hosts working with a single table.
14. Halloween Wreath-Making Station
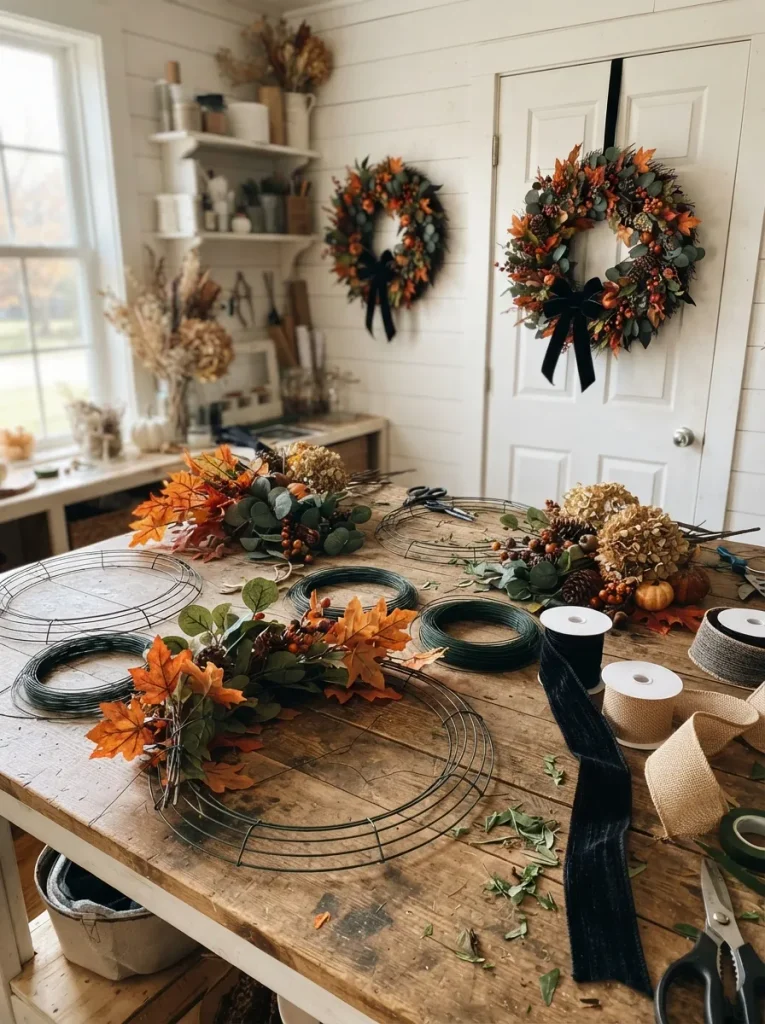
What it looks like: Wire forms slowly filling in with black ribbon and faux foliage into full, ready-to-hang wreaths.
Why it works: A wreath station gives guests a project with a genuinely useful end result something that goes straight on a front door instead of into a drawer which tends to pull in the guests who skip the smaller crafts.
How to copy it: Provide pre-cut wire wreath forms, wide grosgrain ribbon, and floral picks, and have guests wrap and tuck rather than glue glue guns bottleneck fast with only one or two available per table.
Best for: The guest who wants one substantial project instead of five quick ones.
Warning: Hot glue guns left on for the full party are the most common minor burn risk at a craft night set a timer to unplug any unused gun after fifteen minutes of idle time.
What You’ll Need
| Product |
|---|
| Wire wreath forms, 12-inch |
| Wide grosgrain ribbon, black |
| Faux fall foliage picks |
| Floral wire cutters |
15. Trick-or-Treat Favor Bag Assembly Line
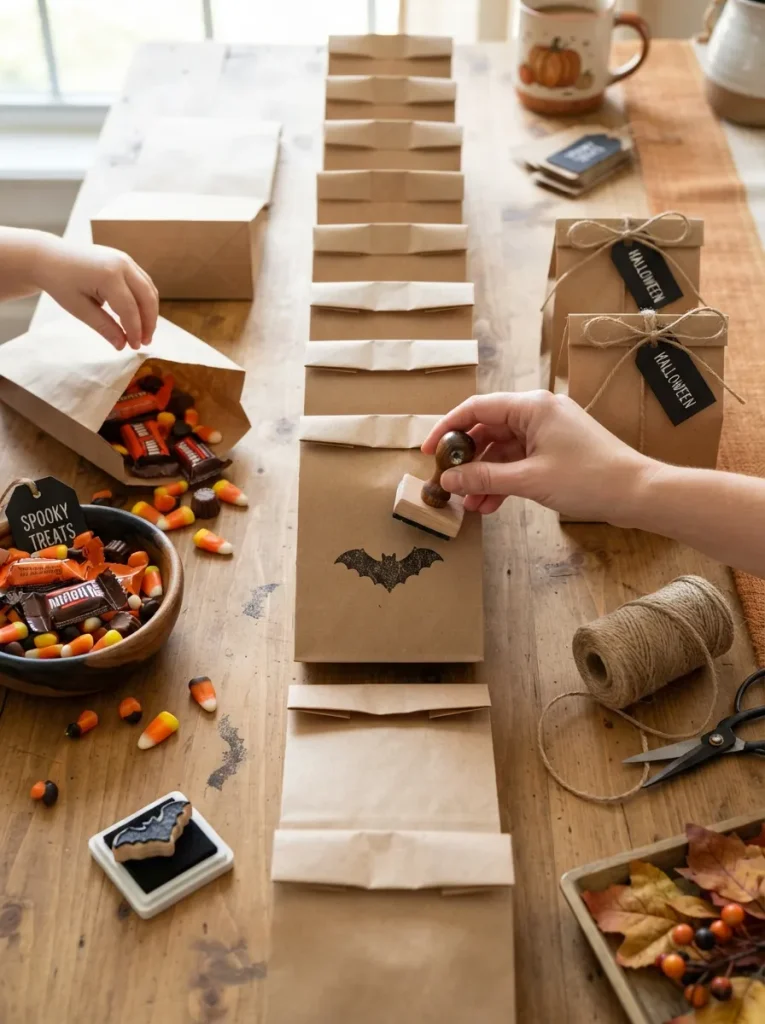
What it looks like: A row of plain kraft bags moving down the table, each one stamped, filled, and tied in turn.
Why it works: An assembly line splits one task into small repeatable steps, so even guests who arrived without any craft interest end up contributing without needing to design anything themselves the same batch-friendly approach behind plenty of handmade gift ideas year-round.
How to copy it: Set up three stations stamping, filling, tying and let people rotate through rather than each person completing a full bag start to finish; it moves noticeably faster.
Best for: Wrapping up the night with something every guest leaves holding.
Budget Version: Plain kraft lunch bags from a grocery store cost a fraction of pre-printed Halloween ones, and a single rubber stamp dresses up a whole stack in minutes.
How to Start Your Halloween Craft Night
What I’ve found with real craft nights is that the table setup matters more than the crafts themselves. Cover it in butcher paper or a vinyl tablecloth before anything else that one move is what makes the difference between a party and a cleanup job. Everything else, lighting, stations, supplies, sits on top of that foundation.
The most common fixable mistake is over-planning the guest list against the craft count. Six people at a five-craft table means constant waiting; six people at a two-craft table with duplicated supplies means nobody’s idle. Cut the craft list before the party, not during it.
Three items under $50 that pull real weight: a roll of black metallic fringe curtain ($12) for instant backdrop drama, a multipack of battery tealights ($15) that make every jar and luminary craft work without a fire risk, and a bag of foam craft pumpkins ($18) that go further than real ones and never rot on the table.
A full setup shopping, prepping stations, and the party itself realistically takes one weekend: a Saturday morning for supplies, an hour the night before for prep, and a two-and-a-half to three-hour gathering. Budget for six to eight guests runs $40 to $90 depending on how many stations run resin or wreath-grade supplies versus paper crafts.
Ready to Host Your Dream Halloween Craft Night?
Fifteen ideas, and no two of them ask for the same skill some are five-minute wine glass wraps, some are an overnight resin cure, and a few are just about how the table gets set. Nobody needs to attempt all fifteen in one night, and picking three well is a better party than picking ten half-finished ones.
Start today with the one move that changes the least effort for the most payoff: cover the table and set out the tealights. The whole point of a night like this is that it feels like something happened, not like a Pinterest board come to life. Save the ones that fit your group now the resin coasters especially, since that’s the one worth planning a full weekend around.
You Might Also Like
- 10 Dollar-Store Halloween Decor Hacks That Don’t Look Cheap
- 12 Cozy Fall Tablescape Ideas for a Dinner Party at Home
- 8 DIY Halloween Wreaths You Can Make in Under an Hour