12 IKEA Kallax Craft Room Storage Ideas for Makers
A Kallax shelf turns from a bookcase into a craft room command center the moment you start treating each cube like a job, not just a slot for stuff. Here are 12 IKEA Kallax craft room storage ideas built specifically for makers who need real storage, not just tidy photos.
There’s a particular kind of relief in walking into a craft space and knowing exactly where the rotary cutter lives. No more digging through drawers mid-project, no more buying a third glue gun because the first two vanished into a bin somewhere. A well-organized Kallax setup gives every tool, scrap, and half-finished project a home and that kind of order tends to spill into how much you actually get made.
Let’s get your cubes working as hard as you do.
Jump To
- Why Kallax Craft Room Storage Makes Such a Difference
- 12 Kallax Craft Room Storage Ideas for Makers
- How to Start Your Craft Room Storage Transformation
- Ready to Create Your Dream Craft Room?
Why Kallax Craft Room Storage Makes Such a Difference
Kallax started as IKEA’s modular bookcase, but its 13-inch cubbies happen to fit nearly every craft storage insert sold fabric bins, letter trays, spool racks. The laminated particleboard shelves are load-rated, which matters once you’re stacking jars of buttons or bolts of fabric.
It suits small rooms because it stacks vertically instead of sprawling, and shared spaces because closed doors hide the mess fast. Starting from zero? Standardize bin sizes before anything else mismatched bins are the top reason these setups fall apart within a month.
| Best starting point | Standardizing bin sizes across every cube |
| Biggest impact area | The cube closest to your main work surface |
| Budget to start | $80–$150 for one 4×4 unit plus bins |
| Time to complete | A weekend for one unit, 2–3 weekends for a full room |
12 Kallax Craft Room Storage Ideas for Makers
1. Clear Storage Bins with Bold Labels for Instant Visibility
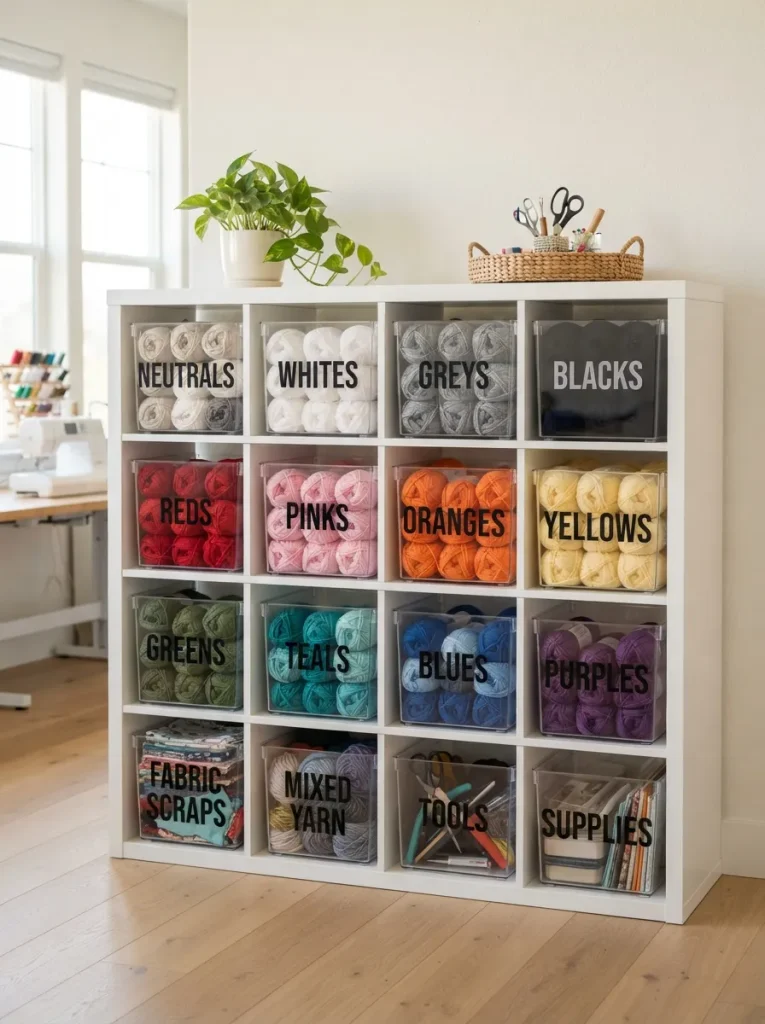
What it looks like: Clean, see-through, unmistakably sorted you can spot the right bin from across the room.
Why it works: Vision is a shortcut. Clear bins remove the guessing that opaque baskets create, and a bold label not a cute one, a legible one cuts the seconds you spend searching before you even reach the shelf.
How to copy it: Use 10x10x10 clear bins that fit two per cube, and label with a label maker set to at least 0.5-inch font. Sort by material type first (fabric, yarn, paper) rather than by project, since projects change but material categories don’t the same logic behind good closet organization systems.
Best for: Anyone who’s lost twenty minutes hunting for a specific spool of thread mid-project, or whose supplies have already spilled into a nearby craft closet too.
Quick Win: Don’t have a label maker? Painter’s tape and a permanent marker peel off clean and work just as well for a first pass.
What You’ll Need
| Product |
|---|
| Clear stackable storage bins with lids |
| Handheld label maker |
| Small bin dividers for mixed items |
| Woven catch-all tray |
| Wall-mounted label tape holder |
2. Insert Drawers for Buttons, Bobbins, and Other Tiny Notions
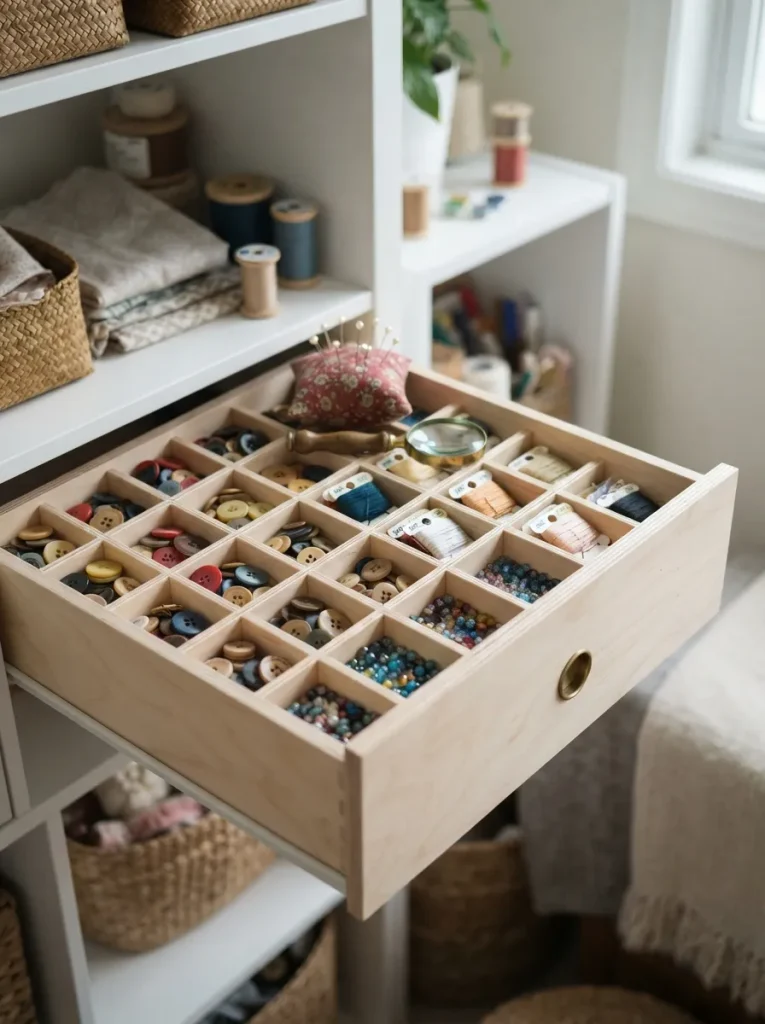
What it looks like: Compact, gridded, faintly satisfying like a hardware store parts bin shrunk down for craft supplies.
Why it works: Small notions get lost in big bins because nothing stops them from mixing together. A drawer insert with fixed compartments creates a permanent address for each item, which is a different organizing principle than sorting by category it’s sorting by exact location.
How to copy it: Buy a birch plywood drawer insert sized for a single Kallax cube (roughly 13x13x15 inches), and add a second layer of small plastic dividers inside for anything under an inch, like snaps or seed beads.
Best for: Sewists, jewelry makers, and anyone working with parts small enough to vanish into carpet.
Pro Tip: Screw a strip of magnetic tape along the inside back wall of one compartment it holds pins and needles upright so they’re never buried under buttons.
3. Color-Coded Bins Sorted by Project, Not Just Material
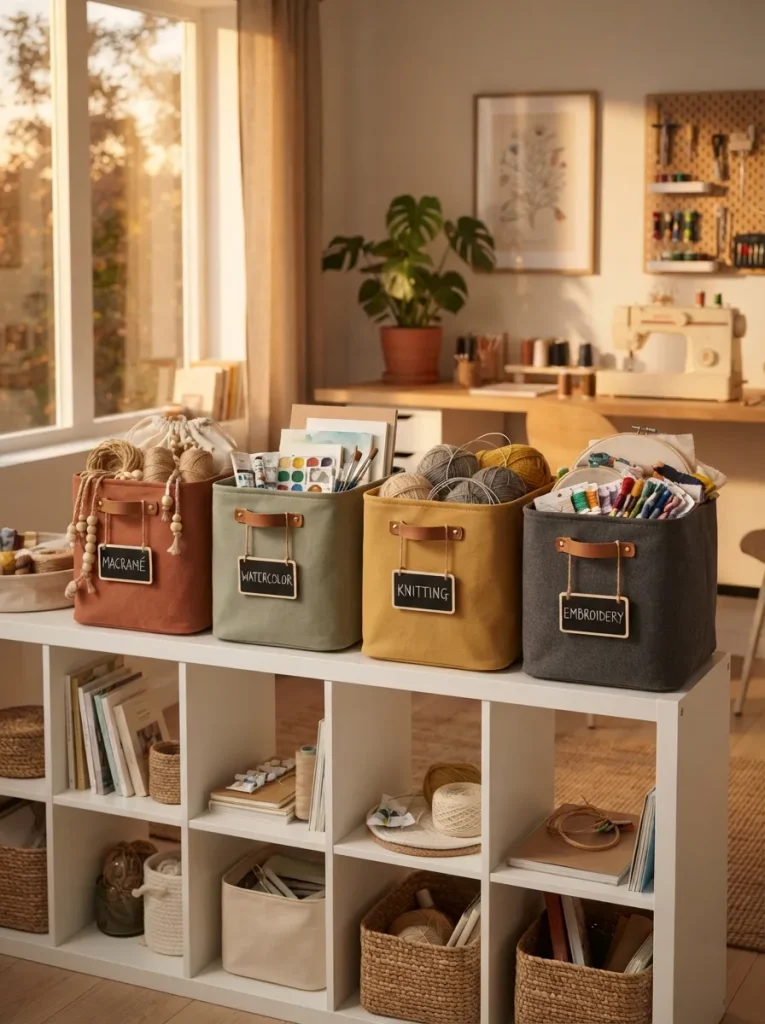
What it looks like: Four distinct colors, each one meaning something specific the moment you glance at the shelf.
Why it works: Material sorting is great for supplies but breaks down when you’re juggling three projects at once. Color-coding by project instead lets you grab everything for “the baby quilt” from one bin, instead of hunting across five material bins for scattered pieces.
How to copy it: Assign one color per active project and cap it at four projects more than that and the color system stops being fast to scan. Canvas drawstring bins work well because the fabric holds color without looking plasticky.
Best for: Makers juggling multiple projects at once who keep losing track of which fabric belongs to which piece.
Styling Note: Keep the four bin colors from the same family (all muted, or all saturated) so the row reads as intentional instead of mismatched.
Up next: the setup that turns a single cube into an actual workstation on wheels.
4. A Rolling Kallax Base for a Mobile Cutting Station
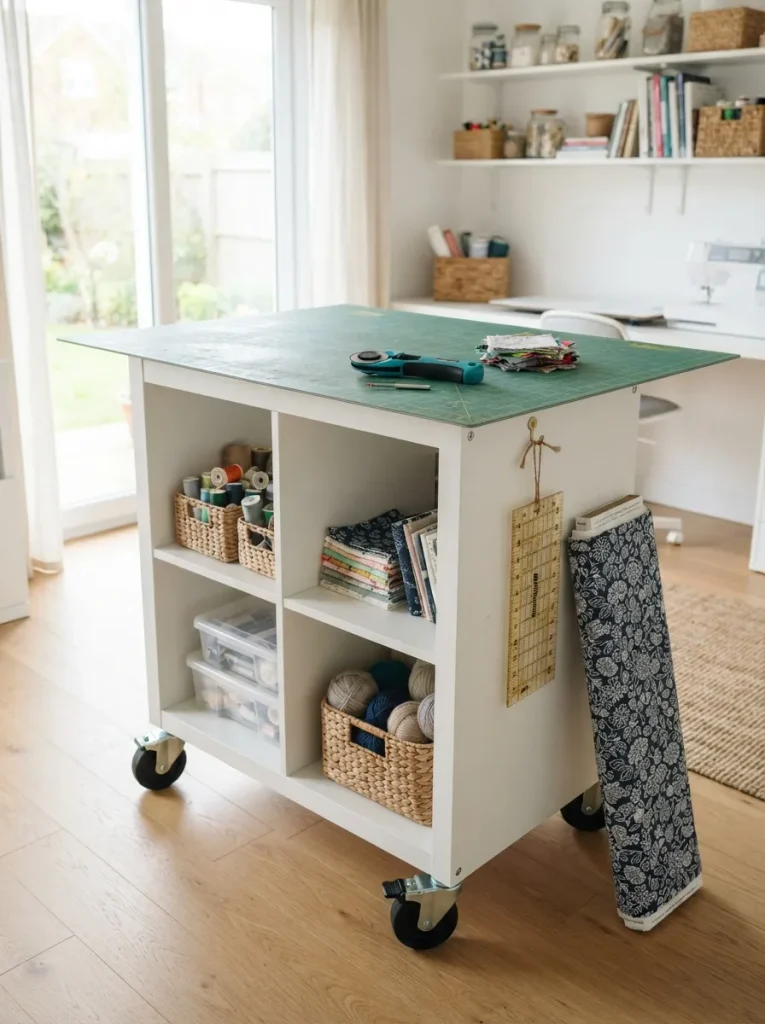
What it looks like: Low, mobile, unapologetically utilitarian a shelf that moonlights as a table on wheels.
Why it works: Fixed furniture forces you to work wherever it sits. Casters turn a 2×2 Kallax into a cutting station you can roll toward better light, push against a wall when guests come over, or wheel next to the sewing machine for one long session.
How to copy it: Use locking casters rated for at least 300 pounds combined, and mount them with the manufacturer’s L-brackets rather than through the laminate alone the laminate strips out under repeated rolling weight.
Best for: Makers working in a shared living space where the craft setup needs to disappear or move. For more ways to adapt the same unit to different rooms, these Kallax styling ideas are worth a look.
Warning: Standard furniture casters aren’t rated for a loaded Kallax plus a cutting mat and fabric stash. Undersized casters crack at the mounting screws within months check the weight rating before you buy.
What You’ll Need
| Product |
|---|
| Locking caster wheels rated 300+ lbs |
| L-bracket caster mounting plates |
| Self-healing rotary cutting mat |
| Fabric bolt holder |
5. A Pegboard Mounted Above the Kallax for Vertical Tool Storage
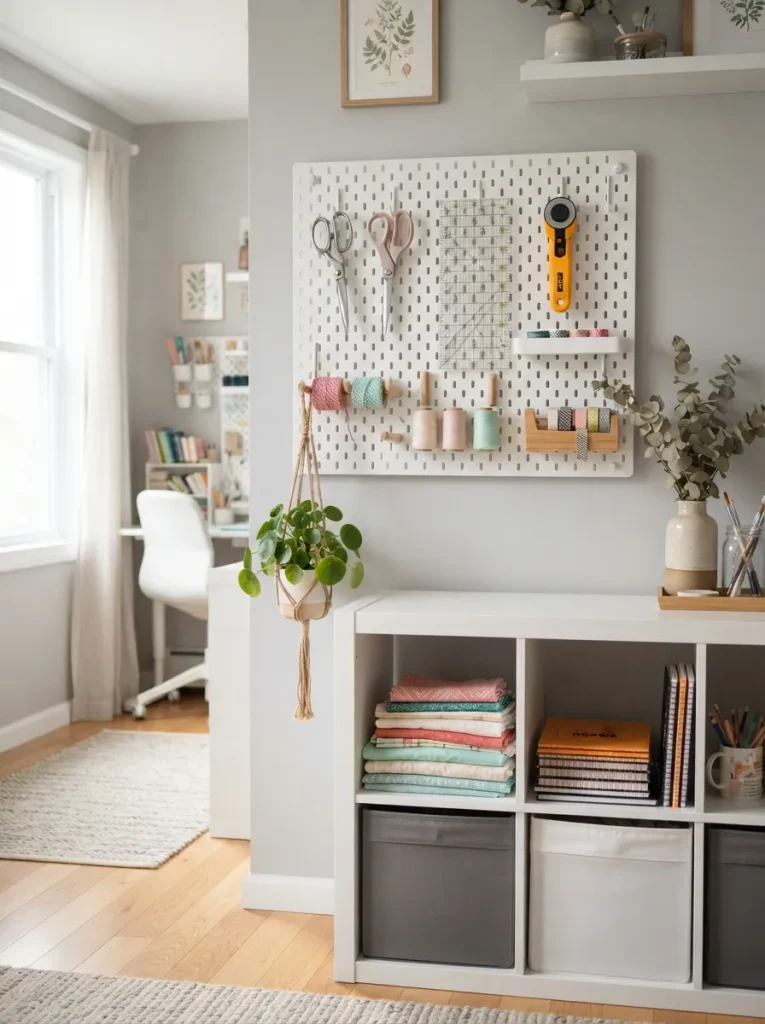
What it looks like: Vertical, tool-forward, the wall doing work the shelf alone can’t.
Why it works: A Kallax stops storing efficiently once it’s full. The pegboard above extends storage upward instead of outward, using wall space that would otherwise sit empty, and it puts frequently grabbed tools in view instead of buried in a cube.
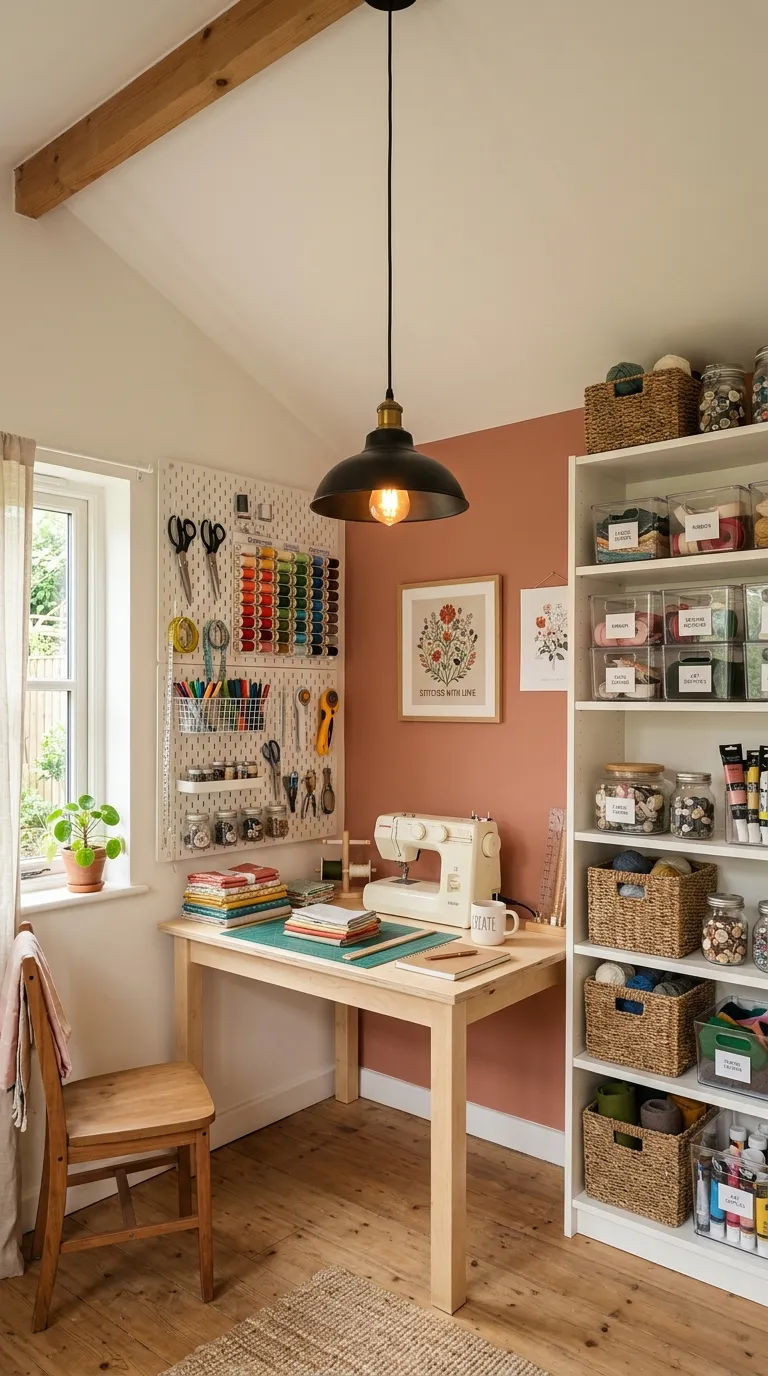
How to copy it: Mount the pegboard so its bottom edge sits 2–3 inches above the Kallax top, and reserve it only for tools you reach for weekly scissors, rulers, a rotary cutter not for storage overflow. It’s a similar layering approach to a lot of craft closet setups, where wall space does as much work as the shelf itself.
Best for: Makers who keep losing scissors in the bottom of a bin.
Small-Space Tip: In a narrow room, a pegboard above the Kallax replaces an entire second storage piece it’s the fastest way to add capacity without adding floor footprint.
6. Battery-Powered LED Strips Inside Dark Cubbies
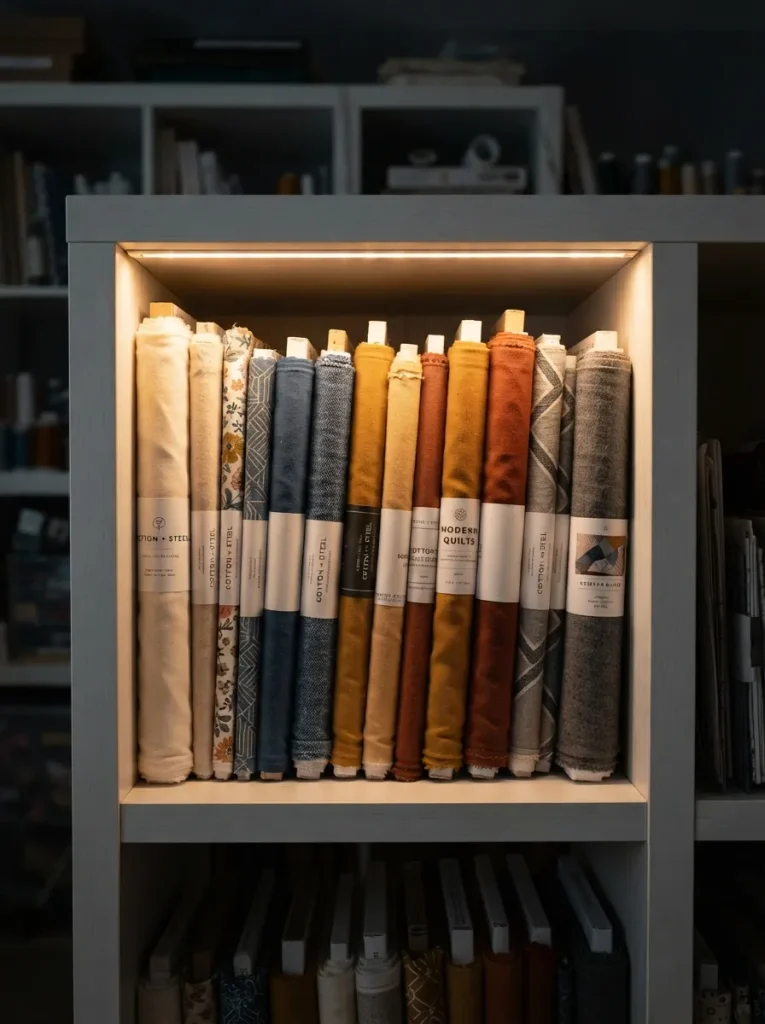
What it looks like: A soft glow at the back of the cube, cutting the shadow that swallows whatever’s stored deepest.
Why it works: Interior cubes don’t get direct room light, so anything stored past the front six inches disappears into shadow. A thin LED strip solves the visibility problem without adding a lamp that eats up cube space.
How to copy it: Stick a battery-powered LED strip to the underside of the shelf above, angled toward the back wall of the cube rather than straight down this lights the contents instead of just the shelf edge.
Best for: The bottom or corner cubes that never get enough daylight to see into clearly.
Important: Battery LED strips run out faster than you’d expect in daily-use cubes check for a low-voltage plug-in option if that cube gets opened more than a few times a day.
The next idea solves a problem most small craft rooms don’t even realize they have.
7. A Sideways Kallax as a Room Divider for a Craft Nook
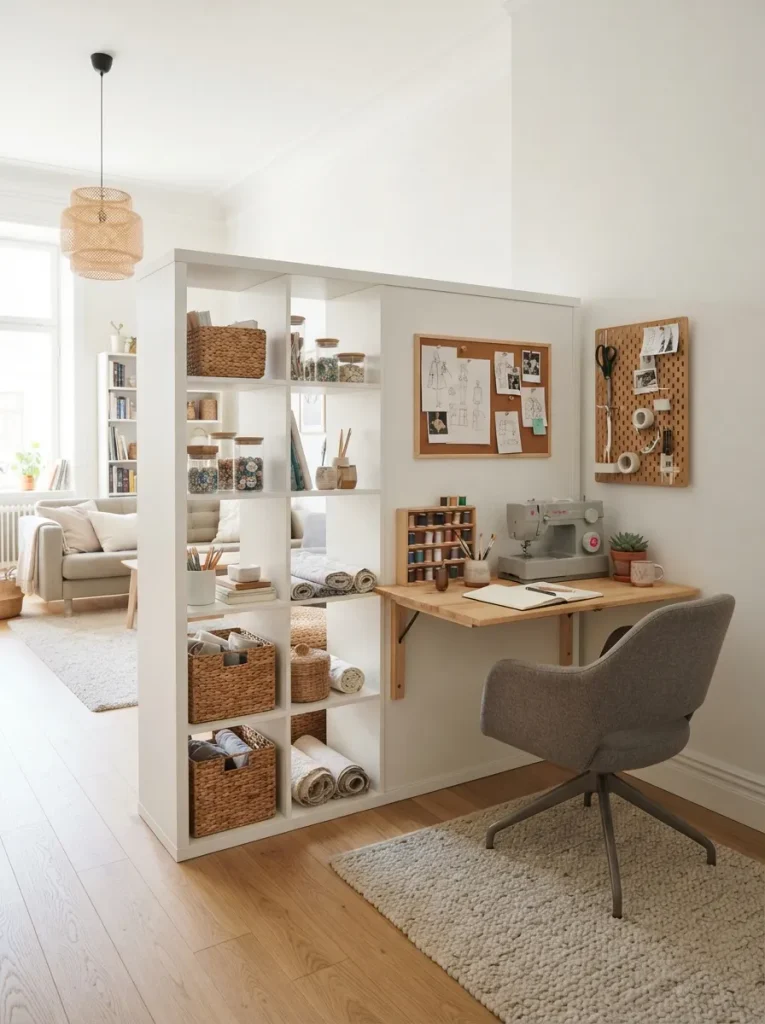
What it looks like: A shelf doing double duty storage on one face, a visual boundary on the other, without actually closing off the room.
Why it works: A studio apartment or open-plan living room rarely has a spare room for crafting, but a 4×2 Kallax turned on its side creates a defined zone using furniture you already need anyway. Open-back cubbies keep light moving through instead of creating a dark tunnel.
How to copy it: Position the Kallax perpendicular to a wall rather than flush against it, and choose the open-back version so light and sightlines still pass through a closed-back divider makes a small room feel boxed in.
Best for: Anyone crafting in a shared or open-plan space with no dedicated room to work with the same challenge covered in these small she-shed and craft room ideas for carving out a workspace from very little square footage.
Mistake to Avoid: Choosing a closed-back Kallax for this use blocks light from the far side of the room and makes a small space feel noticeably smaller open-back is worth the extra cost here.
8. Rattan Basket Inserts for Bulky Supplies
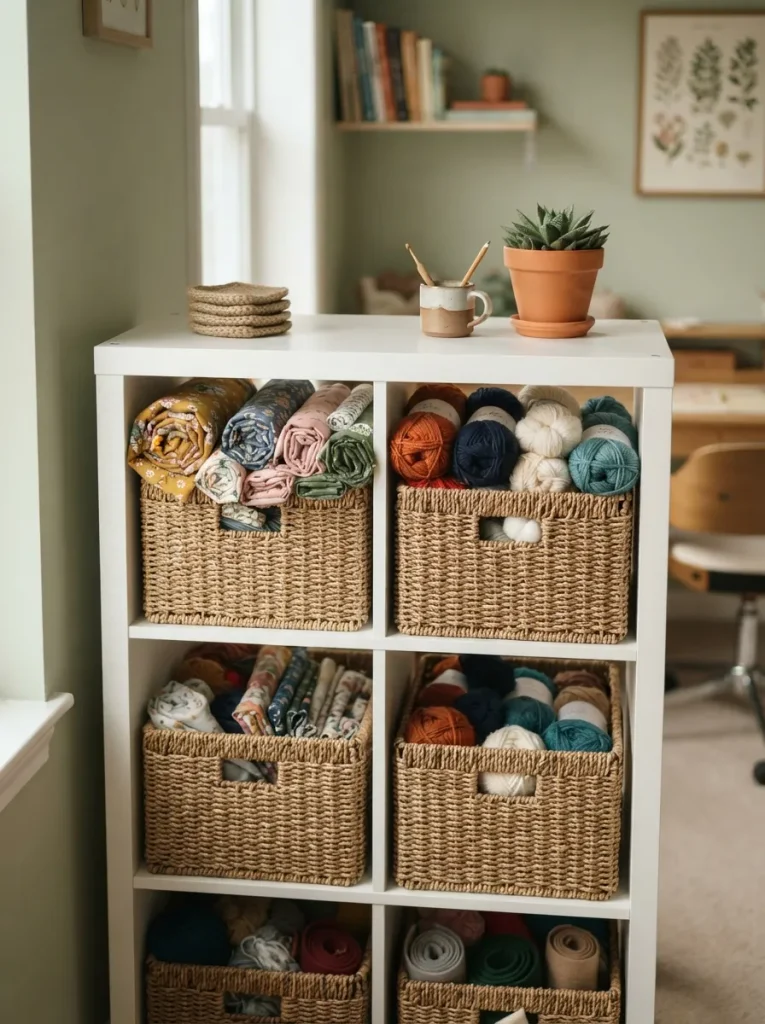
What it looks like: Textured and open-topped, supplies visible above the rim instead of hidden behind a lid.
Why it works: Bulky items like yarn skeins or rolled fabric don’t need full containment they need airflow and quick access. Rattan baskets breathe better than plastic bins, which matters for natural fibers that can trap moisture and mildew in sealed containers.
How to copy it: Choose baskets with handles sized to fit one per cube with about half an inch of clearance on each side, and skip lids entirely for anything you grab more than once a week.
Best for: Yarn and fabric stashes that need to breathe, not just be hidden.
Budget Version: A single rattan basket runs less than a matching plastic bin with lid in most cases buy them one at a time as budget allows rather than a full matching set upfront.
What You’ll Need
| Product |
|---|
| Woven rattan storage baskets with handles |
| Cotton liner bags for loose yarn |
| Small basket labels on twine |
My Views:
Here’s something most guides won’t tell you: the cube you think is the “junk drawer” cube is usually the one closest to your dominant hand at the work surface and if you keep dumping loose scraps there instead of assigning it a real job, you’ll re-sort that exact cube every single week. In real craft rooms I’ve helped organize, that one cube is worth giving a dedicated insert before any of the “nicer” cubes get one.
9. A Butcher Block Top for Instant Extra Work Surface
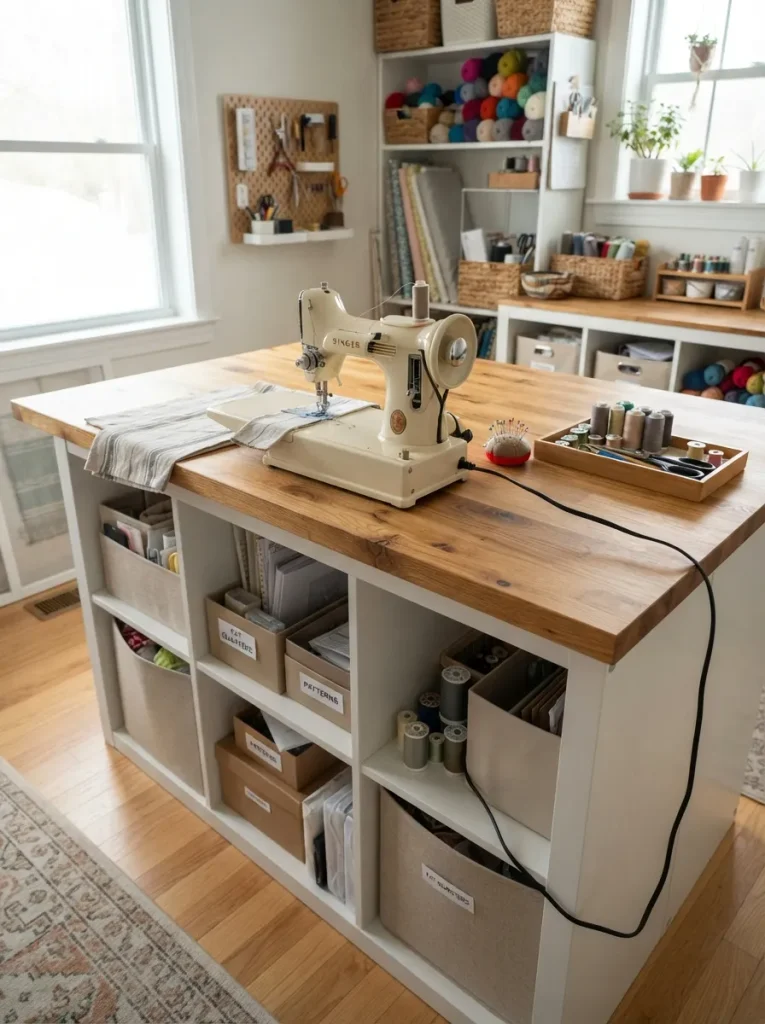
What it looks like: Solid, warm-toned, clearly built for actual work rather than display.
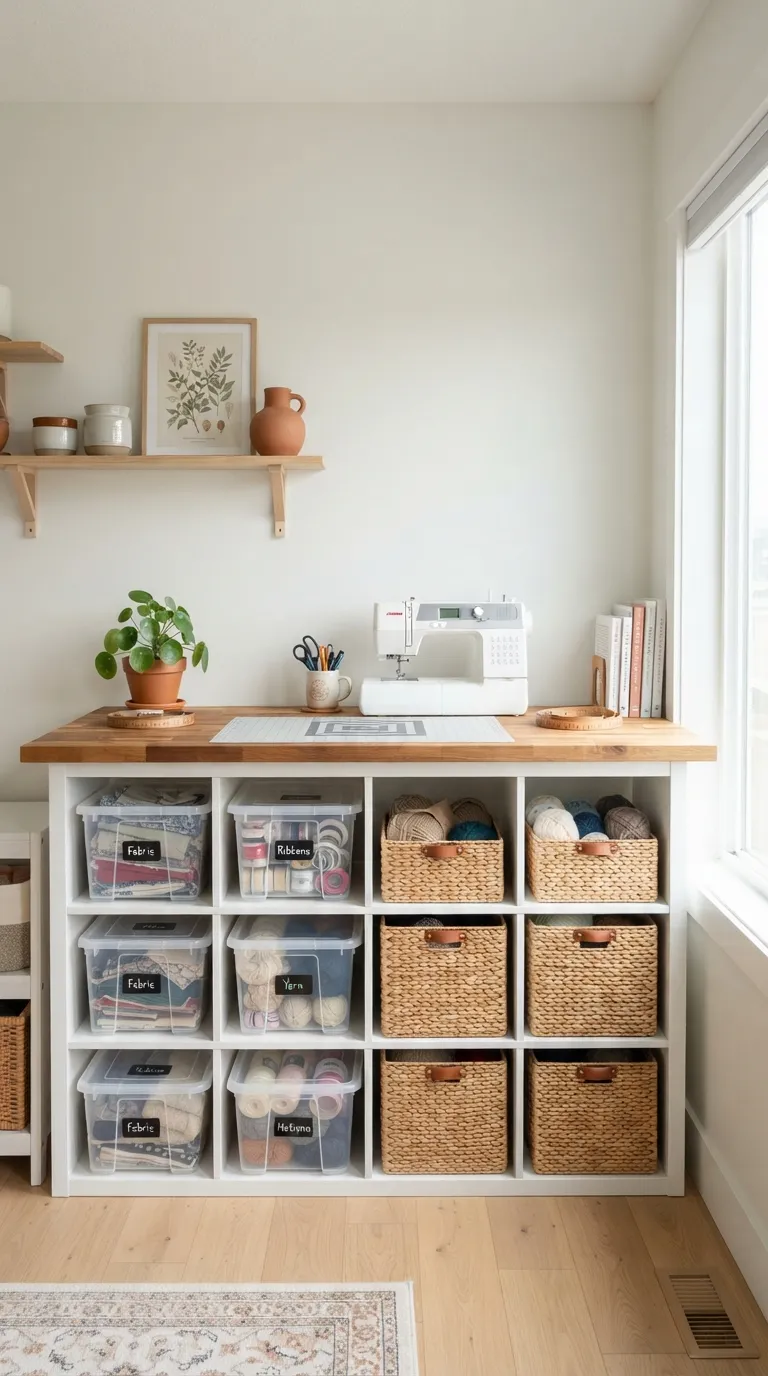
Why it works: A bare Kallax top flexes slightly under sustained pressure like pinning or cutting. A butcher block slab spreads weight evenly and gives a genuinely stable surface, which matters for anything involving a rotary cutter or a sewing machine that vibrates while it runs.
How to copy it: Measure your Kallax footprint before ordering a 4×2 unit needs roughly a 58×15-inch slab and seal any unfinished wood with food-safe mineral oil before use so spilled paint or glue wipes off instead of soaking in.
Best for: Sewists and painters who need one sturdy, dedicated work surface.
✅ Before You Install a Butcher Block Top:
- [ ] Measure the exact top footprint of your Kallax unit, including any overhang you want
- [ ] Sand any rough edges on the slab before placing it
- [ ] Seal unfinished wood with food-safe mineral oil and let it cure for 24 hours
- [ ] Secure the slab to the Kallax top with L-brackets from underneath so it can’t shift
What You’ll Need
| Product |
|---|
| Butcher block countertop slab, cut to size |
| Food-safe mineral oil sealant |
| L-bracket mounting hardware |
Three ideas left, and the next one might be the cheapest fix on this entire list.
10. Two-Tone Painted Cubby Backs for Quick Visual Zoning
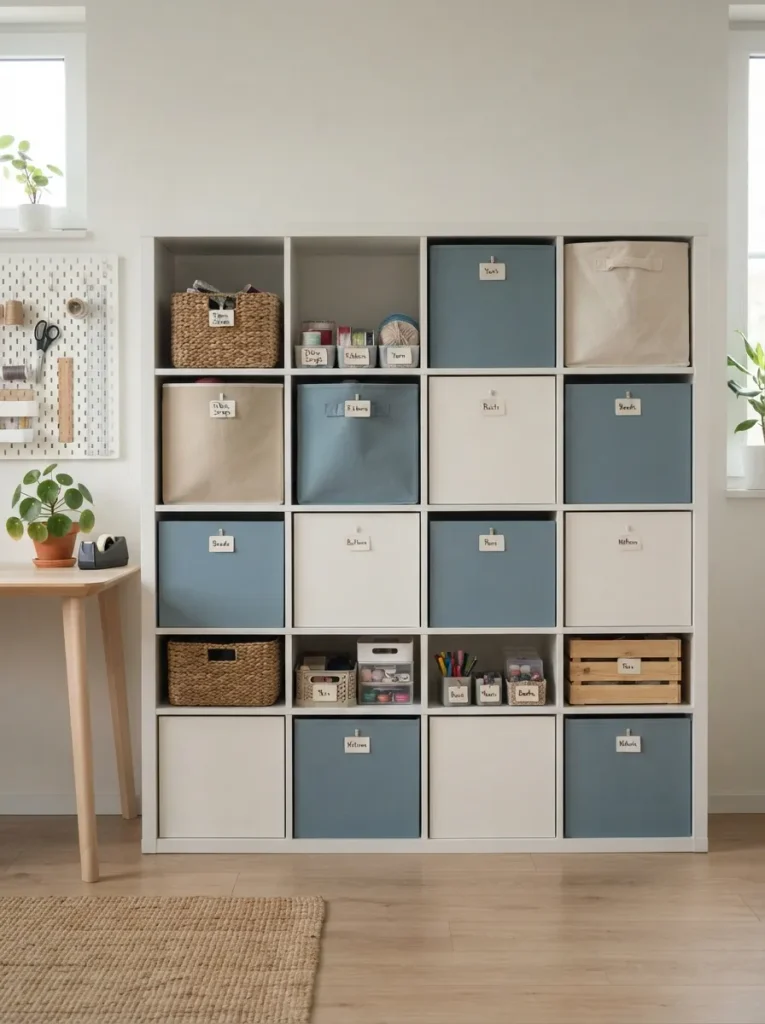
What it looks like: A checkerboard rhythm across the shelf back, quiet but immediately legible.
Why it works: Color zoning gives your eye a fast reference point without reading a single label blue cubes mean fabric, white cubes mean paper goods, or however you split it. That kind of visual shortcut speeds up put-away far more than a matching neutral shelf does.
How to copy it: Remove the pressed-board back panels (most Kallax units have them), paint alternating panels in two contrasting colors, and let them cure fully before reinstalling painting them in place risks drips on the frame.
Best for: Visual thinkers who sort faster by color than by reading text.
Quick Win: No time to remove the panels? Tape off a simple stripe or block pattern directly on the existing panel and paint over it less durable, but done in an afternoon.
11. Chalkboard Tags for Bins That Change Contents Often
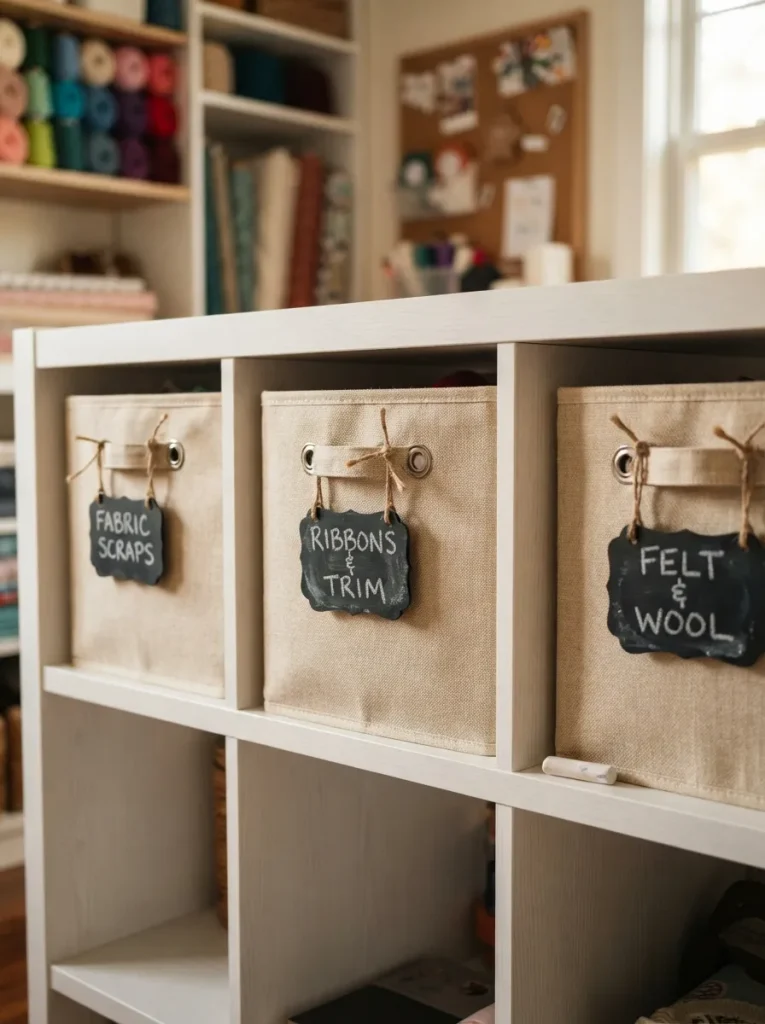
What it looks like: Handwritten and slightly imperfect, which is exactly the point these labels are meant to change.
Why it works: Printed labels assume permanence, but craft bins rarely hold the same thing for long. Chalkboard tags let you relabel a bin in ten seconds when a project wraps and a new one takes its spot, instead of peeling off old vinyl residue every time.
How to copy it: Tie small chalkboard tags to bin handles with jute twine, and keep a stick of white chalk and a damp cloth in a nearby drawer so relabeling stays a ten-second task, not a five-minute one.
Best for: Makers whose bin contents shift from project to project rather than staying fixed by category.
Pro Tip: Seal chalk writing with a light coat of hairspray if you want a label to survive more than a couple of weeks without smudging.
12. A Clamp-On Task Lamp at the Kallax Workstation
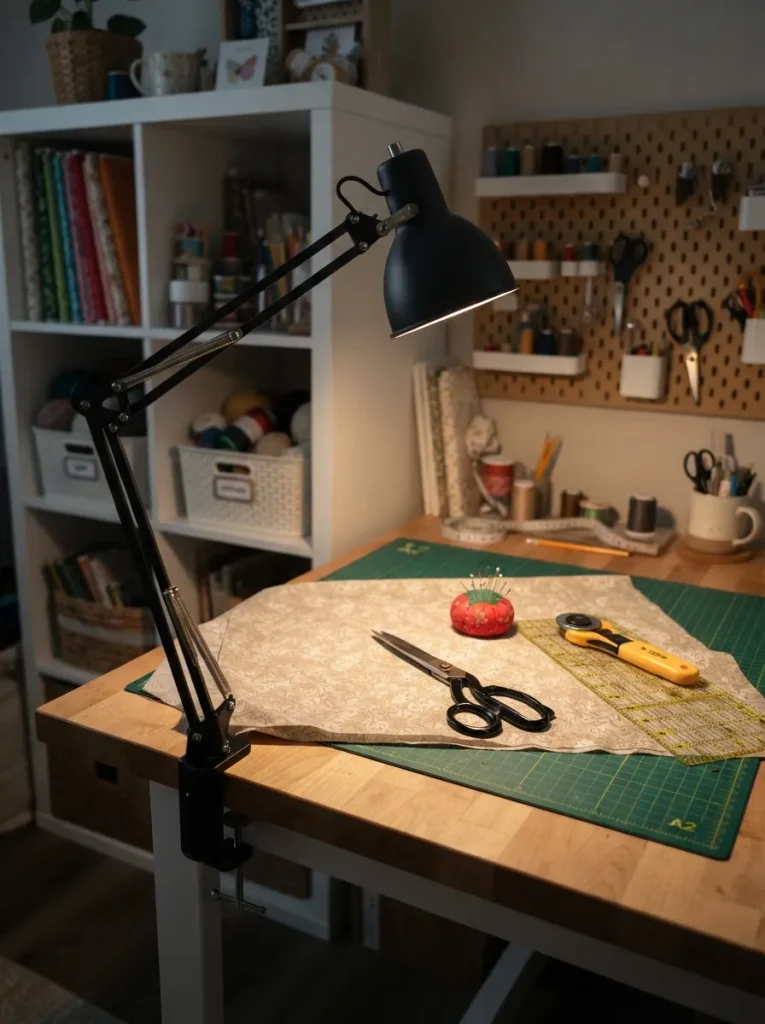
What it looks like: A single focused cone of light landing exactly where the hands are working.
Why it works: Overhead room lighting casts shadows from your own body onto close work like hand-stitching or detail painting. A clamp-on task lamp mounted low and angled removes that shadow entirely, which matters more for accuracy than any amount of ambient brightness.
How to copy it: Clamp the lamp to the desk edge nearest your dominant hand, and angle the head so light hits the work surface at roughly 45 degrees straight-down light still throws a shadow from your head.
Best for: Detail work like hand embroidery, painting, or precision cutting where shadows cause mistakes.
Mistake to Avoid: Mounting the lamp on the wrong side of your dominant hand recreates the exact shadow problem you’re trying to fix clamp it opposite your working hand, not beside it.
How to Start Your Craft Room Storage Transformation
In practice, the first move that actually matters is standardizing your bin size before buying a single organizer. Pick one bin dimension that fits two per cube most makers land on a 10x10x10 clear bin and commit to it across the whole unit. Mixed sizes are the single biggest reason a Kallax setup looks chaotic within a month, no matter how nice the individual bins are.
The most common fixable mistake is sorting by project instead of by material on day one. Projects finish and change constantly, so a bin labeled “baby quilt” becomes dead weight the moment that quilt ships. Sort by material first fabric, yarn, paper, notions and let project-specific color coding layer on top instead of replacing it.
Three items under $50 that make an immediate difference: a handheld label maker for legible bin tags, a roll of magnetic tape to line one drawer compartment for pins and needles, and a battery-powered LED strip for whichever cube sits in the darkest corner. None of them require tools or installation, and all three solve a problem you’ll notice within the first week.
A single 4×4 Kallax with matched bins is a realistic weekend project, start to finish, for somewhere between $80 and $150. A full craft room multiple units, a pegboard, a butcher block top, and lighting is closer to two or three weekends spread out, with a budget in the $400–$700 range depending on how much you build versus buy pre-made.
Ready to Create Your Dream Craft Room?
Between color-coded bins, a rolling cutting station, and a pegboard that finally gets your scissors off the desk, these 12 ideas cover the color, material, and layout changes that actually change how a craft room functions.
None of this needs to happen at once pick the cube closest to your work surface and fix that one first, then work outward as budget and time allow. Today, that might just mean standardizing your bin size or hanging one strip of magnetic tape inside a drawer.
A space where every tool has an address tends to make the work itself feel less like searching and more like making. Save this list, and pin whichever idea solves your most annoying problem first chances are it’s not the one that looks the nicest in photos.
Keep Exploring
- 15 IKEA Kallax Hacks for Small Bedroom Storage
- 10 Budget-Friendly Sewing Room Organization Ideas Under $200
- 8 Pegboard Wall Ideas for Craft and Hobby Rooms