12 IKEA Christmas Tree Alternatives for Tiny Apartments With No Floor Space
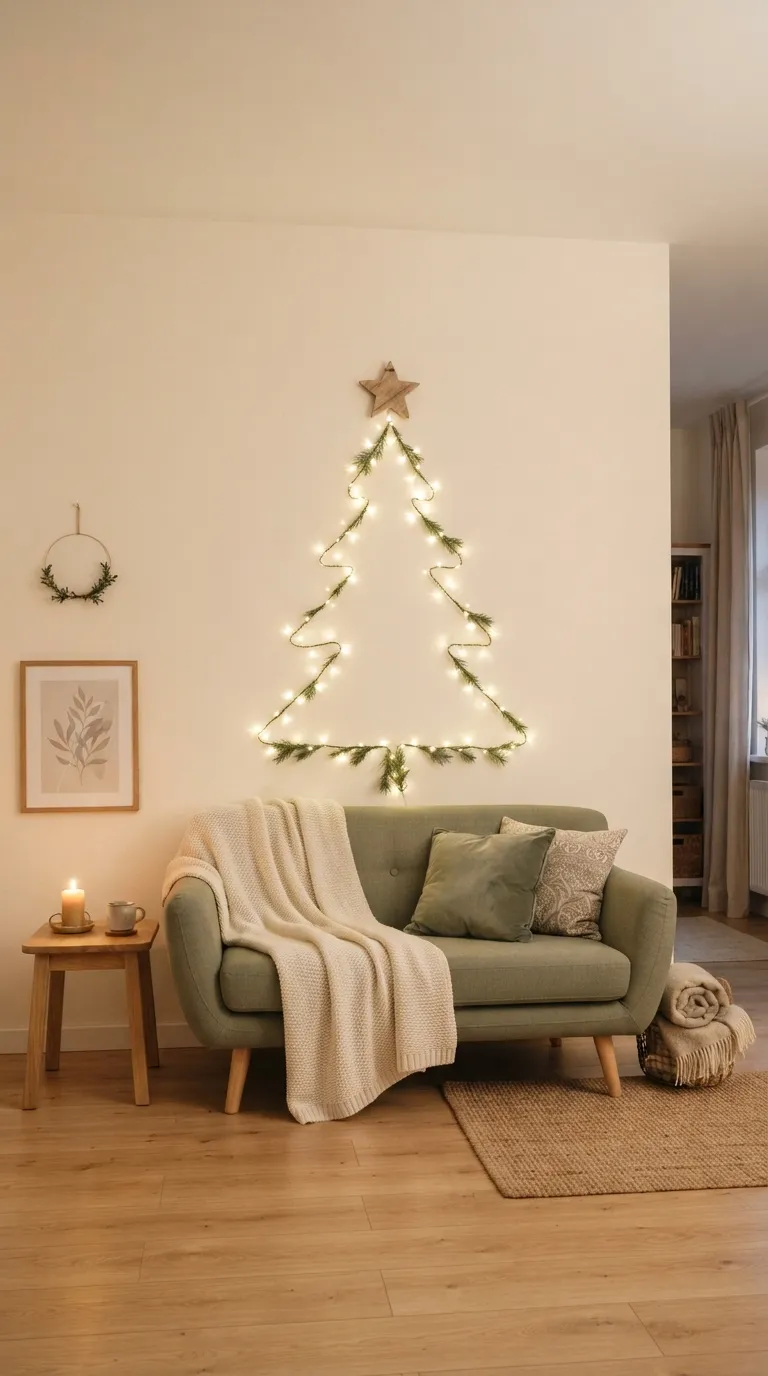
What solves a no-floor-space Christmas is moving the tree onto the walls, the ceiling, the ledges, and the windowsill, where a triangle of light does the job a spruce would. Here are 12 IKEA Christmas tree alternatives for tiny apartments with no floor space, many of them built around the shelves, ledges, and pegboards a flat-pack store already sells.
Picture a warm-white outline glowing on plaster at 6 p.m. A rosemary cone scenting the windowsill. A branch of ornaments floating above the sofa while the walkway stays clear. Zero floor. Full holiday.
Jump To
- Why IKEA Christmas Tree Alternatives for Tiny Apartments With No Floor Space Make Such a Difference
- Twelve Ways to Put a Tree Where the Floor Isn’t
- How to Start Your Floor-Free Christmas Tree Transformation
- Ready to Create Your Dream Tiny-Apartment Christmas?
Why IKEA Christmas Tree Alternatives for Tiny Apartments With No Floor Space Make Such a Difference
Tree alternatives borrow from the vertical plane instead of the floor, the one resource a studio never has in surplus.
Think warm-white fairy lights, matte forest-green felt, raw pine ledges, dried eucalyptus, and brushed brass hooks. Small rentals gain the most: a full tree can swallow a walkway, while a wall tree takes almost no depth. Start with light, since a glowing outline says “tree” faster than any object.
Quick Reference
| Best starting point | A warm-white string-light triangle on your emptiest wall |
| Biggest impact area | The wall you face most from the sofa or bed |
| Budget to start | Roughly $15–$40 (approximate) |
| Time to complete | 30–60 minutes for the first tree; a weekend for a full set |
Twelve Ways to Put a Tree Where the Floor Isn’t
1. Trace a Tree on the Wall With One Strand of Warm-White Lights
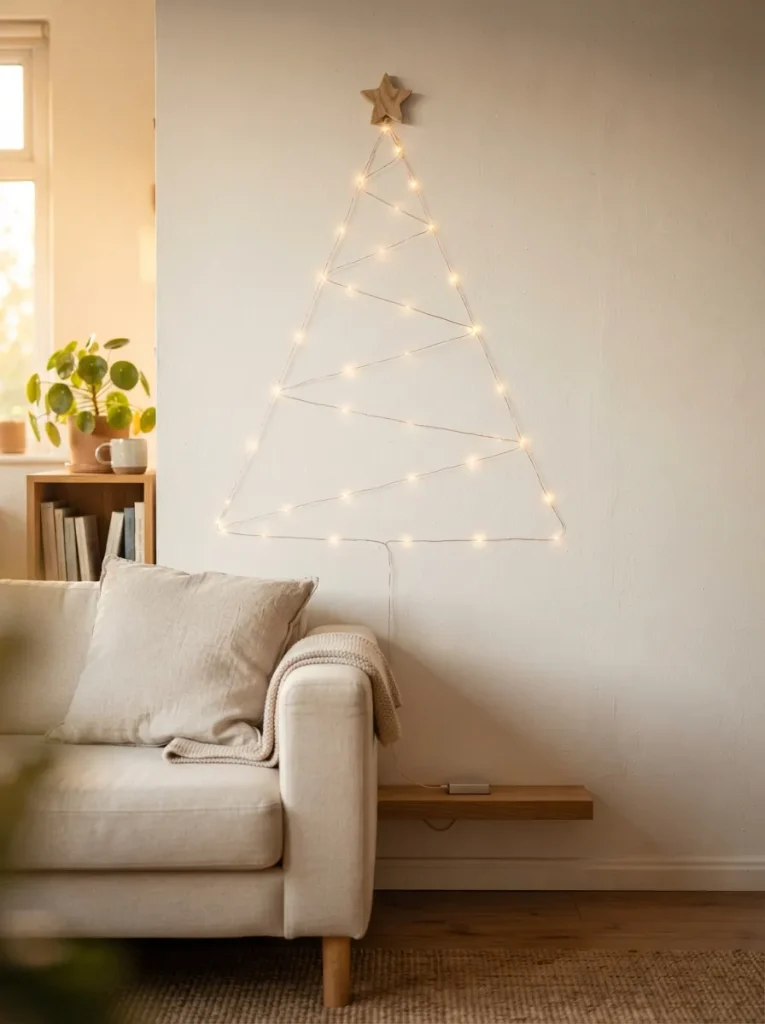
A slim pencil tree is still a floor problem. It needs a footprint plus room to walk around it, and a studio can’t spare either. A wall tree trades that footprint for a triangle of light.
Draw the shape before hanging anything: roughly 5 feet tall and 28 inches across the base, since a base near half the height reads as a tree instead of a dunce cap.
(That’s a practical proportion, not a rule.) Anchor one end at the apex, zigzag down in three or four long passes, and close the shape with a straight baseline. Warm white glows on both pale and dark walls. Choose the emptiest wall near an outlet and run the cord down behind a low shelf.
Warning: Fresh paint stays soft for weeks after it feels dry, and adhesive clips can peel it off with them. Check the can’s cure time, or test one clip in a closet corner first.
Shop This Look
| Product |
|---|
| Warm-white micro fairy lights on thin wire |
| USB or battery power pack with a built-in timer |
| Small metal or wooden star ornament for the apex |
2. Stack Three Picture Ledges Into a Stepped Tree
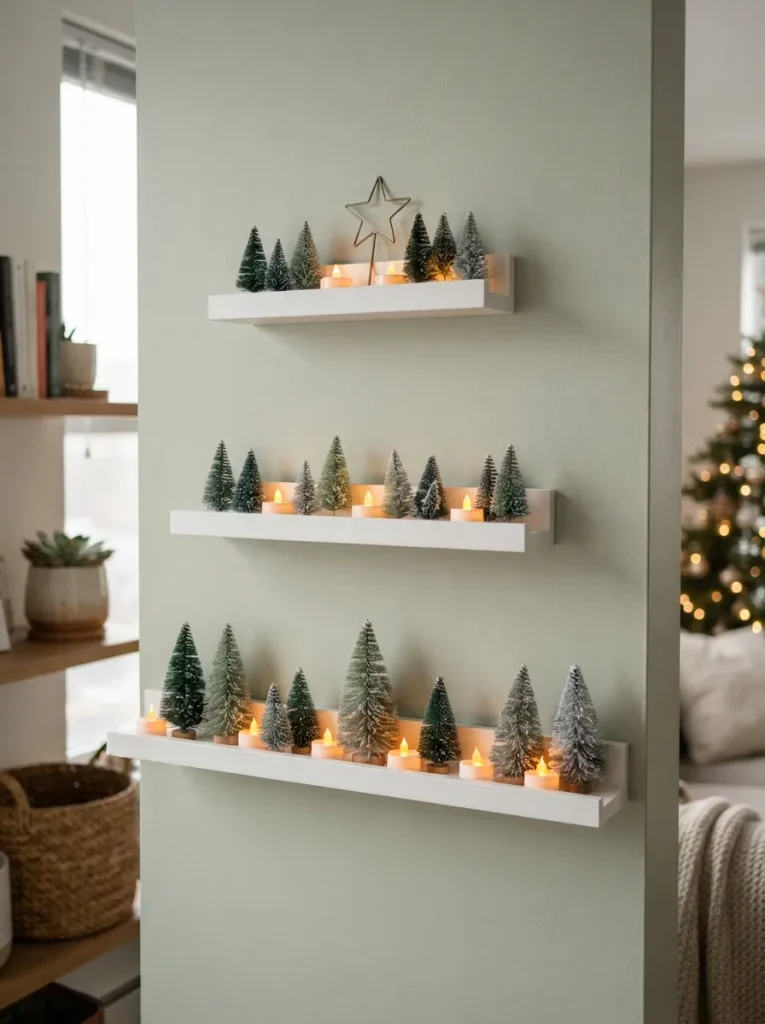
Renters who can drill exactly one row of holes should spend them here. Buy or cut three ledges in graduated lengths, roughly 24, 16, and 8 inches, and mount them on one vertical centerline with about 8 inches between each. The eye reads those gaps as branches, so keep them even.
Line each ledge with tiny bottle-brush trees and flameless tealights, biggest at the bottom, and prop a single star on the top ledge. A front lip stops ornaments rolling off, which is why a ledge works where a plain floating shelf doesn’t. Skip books up here; their weight muddies the taper.
Budget Version: Three shallow ledges, a handful of bottle-brush trees, and a pack of flameless tealights should land under $100 (approximate).
Shop This Look
| Product |
|---|
| Picture ledges in three graduated lengths |
| Bottle-brush mini trees in assorted sizes |
| Flameless LED tealights |
3. Cluster One Color in Three Finishes on Removable Hooks
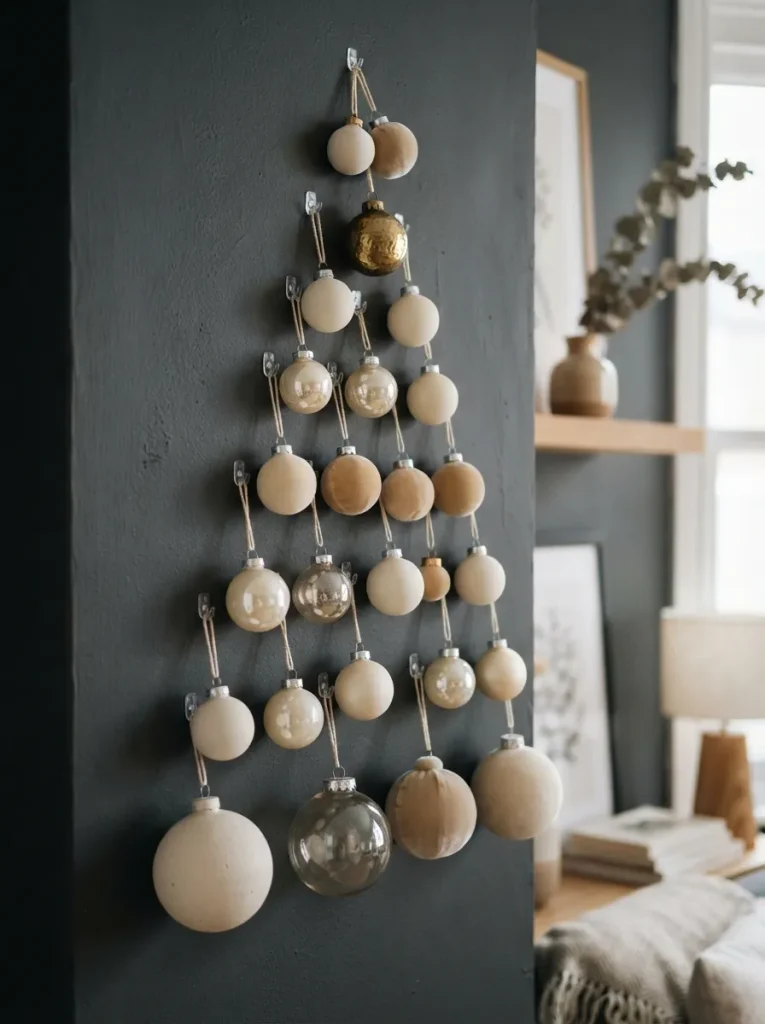
One color in three finishes does more than five colors in one finish. Contrast between matte, gloss, and metallic gives the eye depth that hue changes can’t. Pick a single family, such as cream, and hunt for a matte ceramic bauble, a glossy glass one, and a pompom or velvet piece.
Hang them on removable hooks in a triangle, biggest at the bottom and about a hand-width apart, with just two small ornaments in the top row. From a sofa three feet away, the taper does the work of the branches. Suits anyone allergic to visual noise, and it extends cheaply if you add ornaments a few at a time.
Styling Note: Swap one ornament near the apex for a brass one. A single metallic accent reads as a star without buying a topper.
The next tree is free if there’s a park within walking distance, and it hangs over your head.
4. Hang a Dried Branch Overhead as a Floating Tree
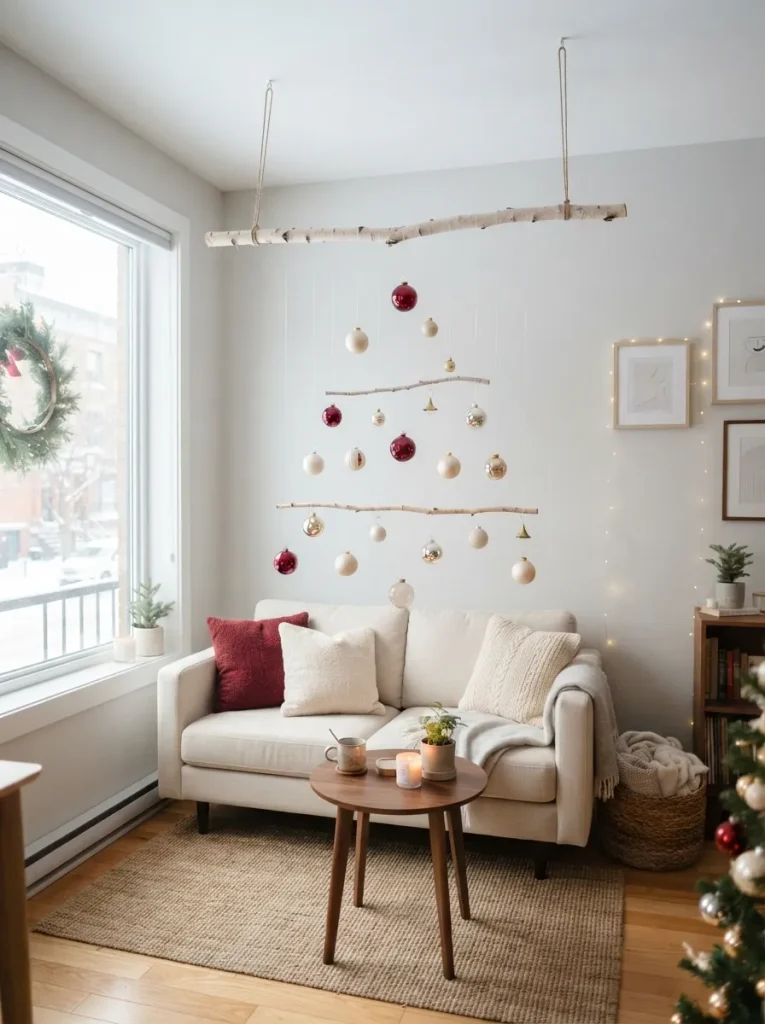
Start with a bare branch about as long as your sofa, taken from a fallen limb rather than a living tree. Let it dry indoors for a few days so loose bark and any stowaway insects show themselves before it goes overhead. Hang it horizontally from two cord loops on ceiling hooks or a curtain rod.
Add ornaments on clear line at three drop lengths, roughly 4, 8, and 12 inches, so the display stair-steps into a loose tree shape. Keep the lowest ornament at least 6 feet 6 inches above the floor over walkways. Best for rooms with 8-foot ceilings and no wall to spare, and the branch stores flat behind a wardrobe afterward.
Pro Tip: Load the branch while it’s already hanging. It will tilt long before it’s overloaded, and you can stop there.
5. Stack Three Wreaths Down the Back of a Door
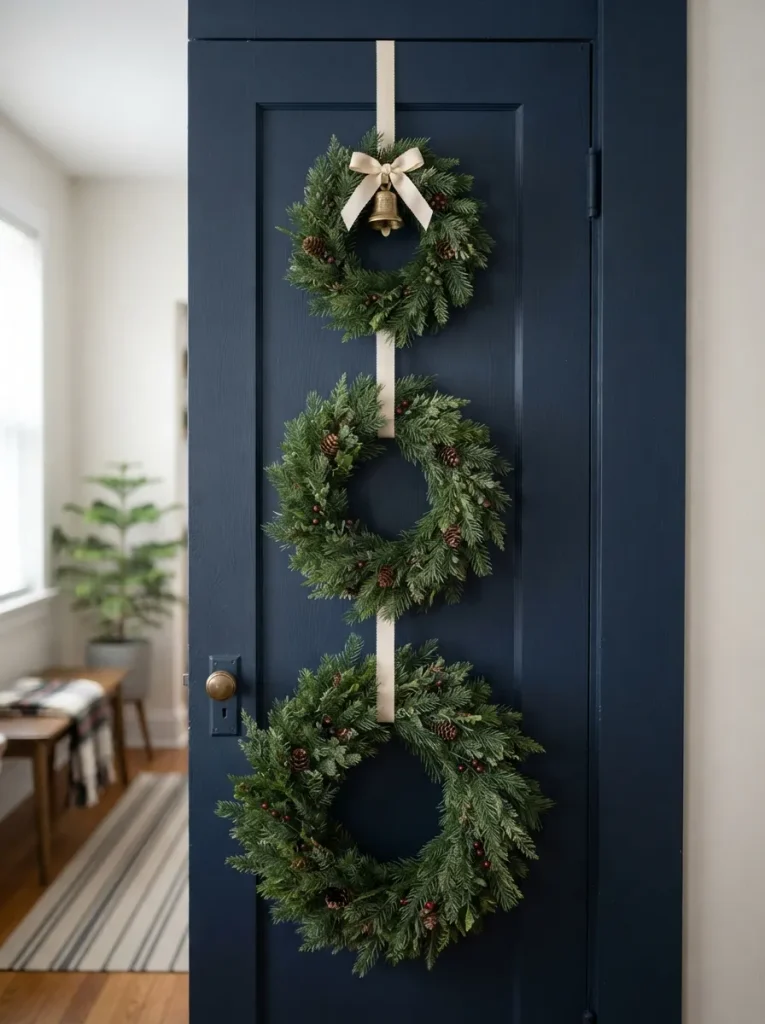
Three wreaths stacked down the back of a closet door, about 24, 18, and 12 inches across from bottom to top, read as a single tiered tree from across the room. A flat painted door gives them a clean backdrop, so the shape holds even with plain faux greenery. Hang each from its own ribbon loop over the door’s top edge, leaving a few inches of door showing between tiers.
Faux is the safer material, since fresh wreaths shed needles quickly near heating. Best for closet, bathroom, and bedroom doors that stay mostly shut.
Mistake to Avoid: Thick ribbon or hooks can stop the door latching, and you’ll find out at midnight. Close the door with everything hanging before you commit.
6. Turn a Pegboard Into a Tiered Tree
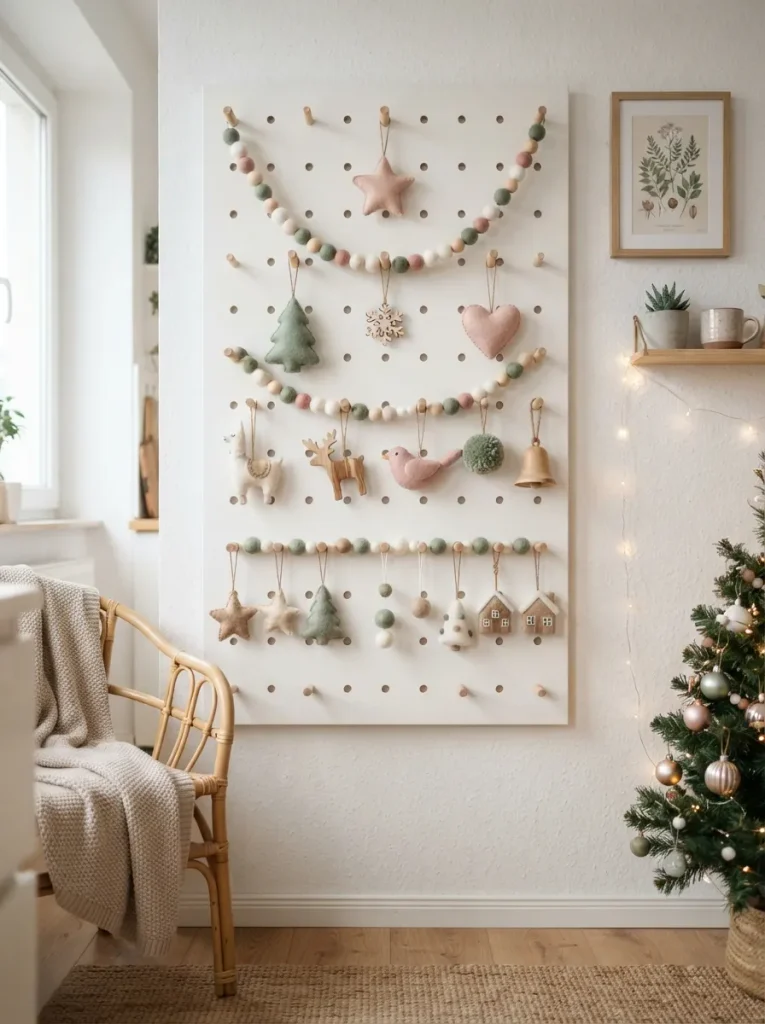
A pegboard is a grid, and a grid is a ready-made branch layout: every hole is a measured position. Build a pyramid of hooks in rows of one, three, five, and seven, then hang lightweight ornaments and a felt-ball garland so each row reads as a tier. Hooks move, so mistakes cost nothing, and you can add a row at a time.
A board such as IKEA’s SKÅDIS outlasts December as a wall organizer for keys or craft tools, which softens the drilling. If drilling is off the table, check the board’s weight and use removable hooks rated well above it. Best for tinkerers who like rearranging.
✅ Peg-Tree Setup:
- [ ] Find the center hole of the top row and place the first hook there
- [ ] Add rows of three, five, and seven hooks, each centered under the row above
- [ ] Hang the heaviest ornaments on the bottom row first
- [ ] Drape the garland last, tier by tier, then step back and check the taper
Shop This Look
| Product |
|---|
| Pegboard panel with mounting hardware |
| Pegboard hook and peg set |
| Felt-ball garland |
Your window already glows at night; the next idea teaches it to look like a tree from the street.
7. Hang Ornaments in Rows From the Curtain Rod
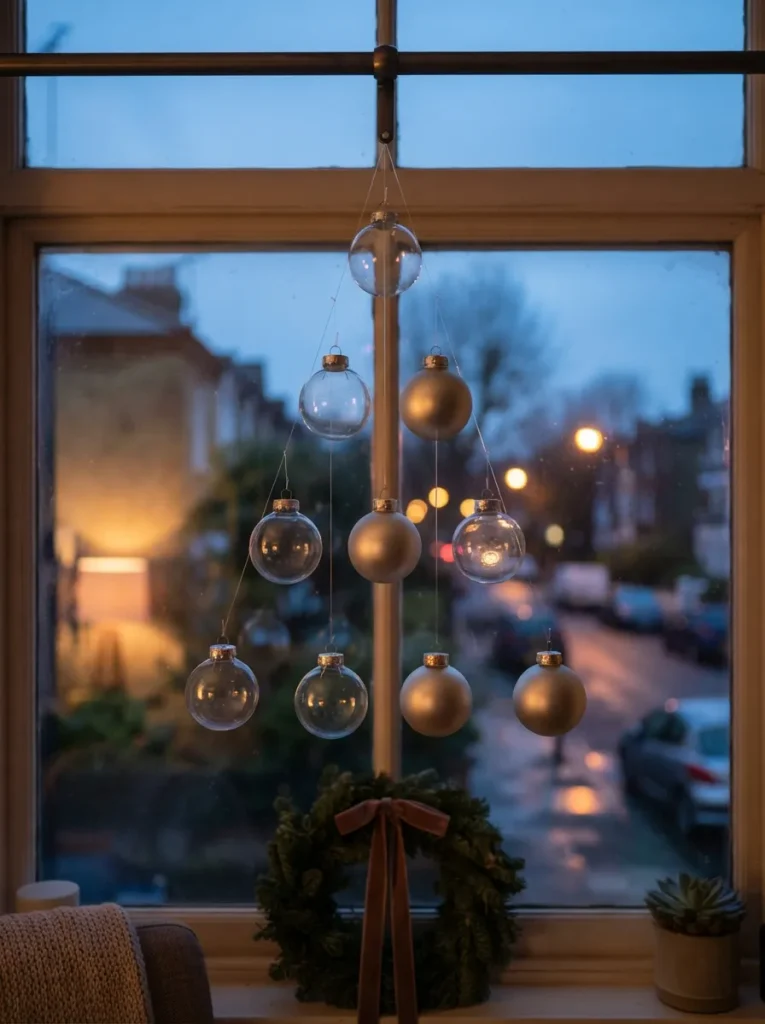
Stick-on window clings are the usual answer, and they read as stickers. Real baubles do better. Hang lightweight ornaments from a curtain rod on clear line: one at top center, then rows of two, three, and four below, each row’s drop longer than the last so the whole thing widens into a triangle.
Glass catches daylight and bounces streetlight at dusk, and neighbors get a tree too. Keep to about ten shatterproof ornaments. Best for renters with a window and no wall to spare.
Important: Most people assume a rod that holds heavy drapes will hold ornaments too. Fabric spreads weight along the whole length, while ornaments concentrate it in points, so check the brackets and add a center support on long spans.
8. Use the Gap Above the Wardrobe as the Tree Stand
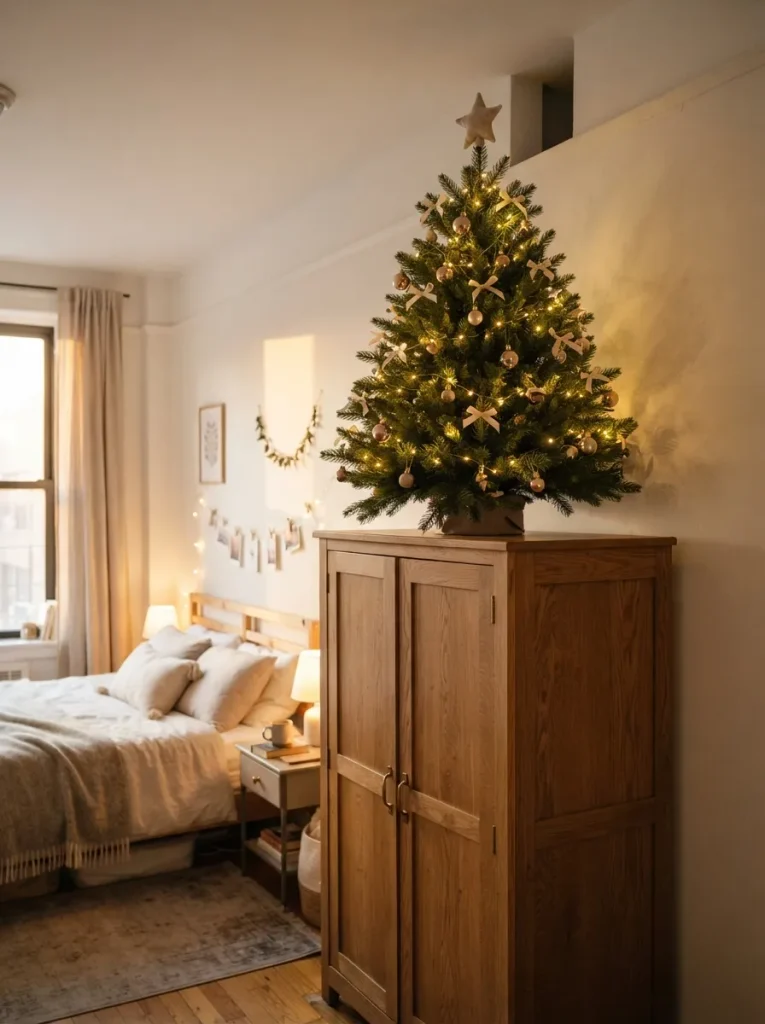
Anyone whose wardrobe stops short of the ceiling already owns a tree stand. That gap, usually the least-used space in a small bedroom, holds a tabletop tree without touching the floor or a single surface you use. Choose a tree about 24 inches tall with a full lower tier, since anything above eye level is seen from underneath and slim ones look like sticks.
Set it back from the edge and leave a hand’s width below the ceiling. Heat and dust collect up there, so use LED strands. Best for bedrooms with tall storage and nowhere else to go.
Quick Win: Plug the lights into a smart plug or timer. Nobody wants to climb to reach a switch.
9. Trim a Rosemary Cone for the Windowsill
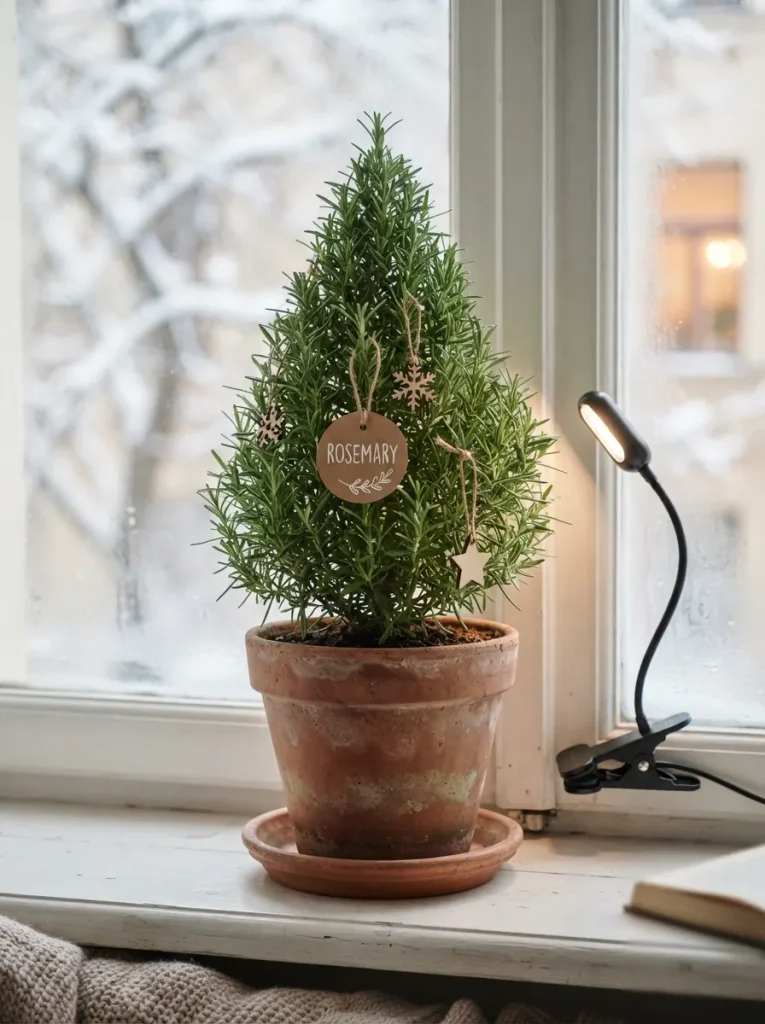
A rosemary trimmed into a cone sits on a bright windowsill and smells faintly of a roast dinner, and it takes little more than a saucer of sill. Choose a plant already shaped as a small tree, in a pot with a drainage hole. Rosemary hates wet roots, so water only when the top inch of soil is dry; overwatering is a common way indoor rosemary dies.
Decorate with paper tags or a few tiny ornaments, since heavy baubles snap branches. Best for people who want green without a plastic tree, and who cook. After Christmas, it keeps growing on the sill and goes into dinner.
Shop This Look
| Product |
|---|
| Rosemary topiary trimmed as a small cone tree |
| Terracotta pot with drainage hole and saucer |
| Small clip-on LED grow light |
The next tree is built entirely from mail you haven’t received yet.
10. Zigzag Twine Into a Card-Holding Tree
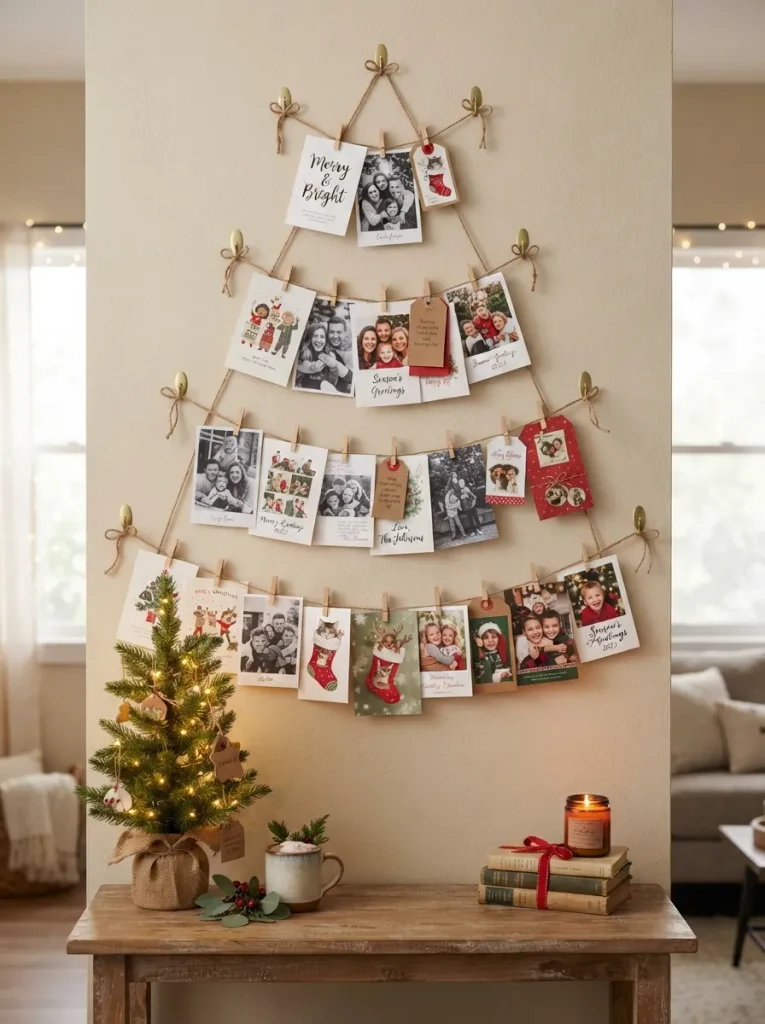
Run twine in four horizontal rows on a wall, each longer than the one above, from about 10 inches at the top to about 34 at the bottom, and pin cards to it with mini clothespins. The rows stair-step into a triangle before a single card goes up. Cards arrive gradually, so the tree grows through December and quietly solves the plain-wall problem.
Short on cards? Fill gaps with photo prints, postcards, or kids’ drawings. Best for anyone who gets holiday mail, or wants a wall tree that changes each week.
Pro Tip: Tie a small loop at each end of the twine and hang it from removable hooks, so you can retighten as the load grows.
Observation
The counterintuitive part: on a wall, an empty outline beats a filled one. Two slanting sides and a base are enough for the eye to complete the tree, and every extra row packed inside the triangle blurs the silhouette. A 5-foot outline with three or four strand passes reads more clearly across a small room than the same triangle stuffed with ornaments.
11. Spiral Six Books Into a Shelf Tree

Stacked-book trees usually slump because people stack by cover color instead of size. Sort by width: widest hardcover at the bottom, each book roughly an inch narrower, and rotate each a few degrees from the one below so the corners fan out like branches. Six books is the practical maximum before the stack tips.
Top it with a small sprig or ornament. Best for a shelf or console you’re already stuck with, and the books go back to being books on December 27.
Styling Note: Weave a battery micro-light strand between the books and let the wire exit through the back edge, so the stack glows from within.
12. Suspend a Light Cone From a Ring
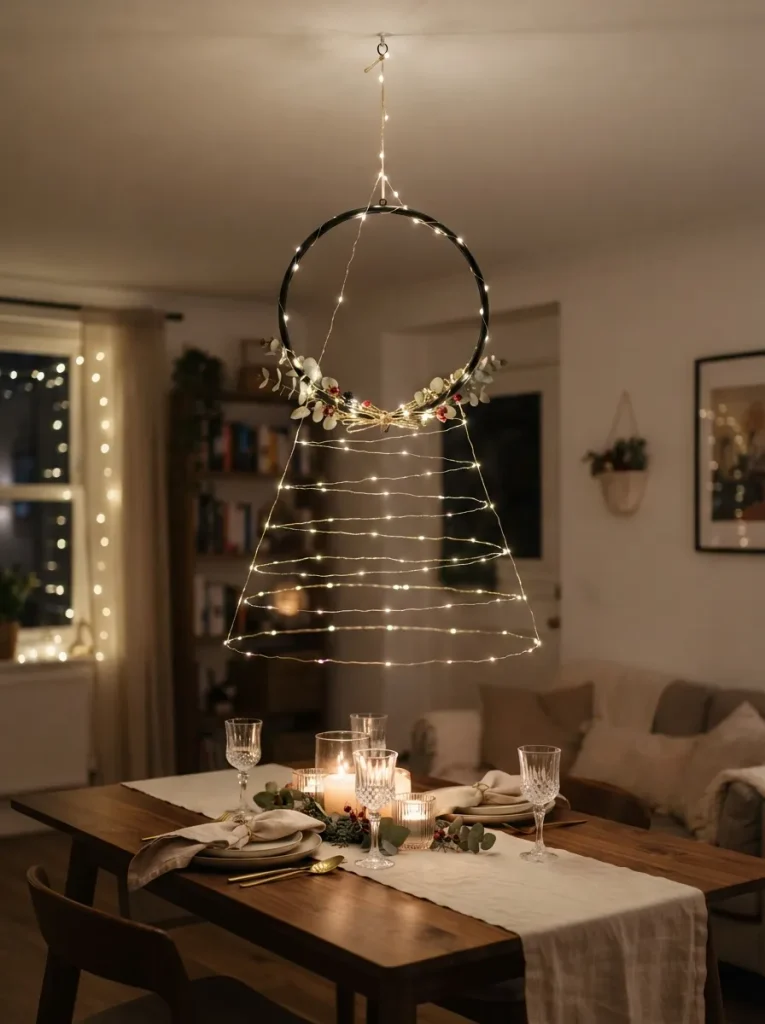
A ring hovers in the air with lit strands streaming up from it to a single point on the ceiling, and from across the room those converging lines resolve into a cone. Use a wreath ring or a 12-inch embroidery hoop. Run one long fairy-light strand from the apex down to the ring and back up, four passes, attaching it at even points.
Over walkways, keep the ring at least 6 feet 6 inches above the floor. Over a table or bed, where nobody walks under it, it can hang lower and the cone grows taller. No ceiling hook allowed? Loop the top of the line around the middle of a curtain rod.
How to Start Your Floor-Free Christmas Tree Transformation
Start here: one strand of warm-white fairy lights and the emptiest wall you own. A lit outline needs no drilling, costs the least of any idea above, and sets the color temperature every later idea should match.
Mixing cool-white and warm-white strands is the beginner error that ruins the look. Side by side, they read as two different trees on one wall, and the cool one looks like a hospital corridor. Buy all your lights in one batch, and lay them together on the floor before hanging.
Three items that don’t appear above: a dozen matte shatterproof ornaments in one color, a pack of mini wooden clothespins, and a smart plug for lights you can’t reach. Each typically sits comfortably under $50, as a guideline rather than a quote.
Plan on 30–60 minutes for your first tree and a weekend for a full set. A starter setup with one wall tree runs roughly $15–$40 (approximate), while a three-tree setup runs roughly $80–$150. Ledges and a pegboard are drilling jobs; lights, cards, wreaths, and books are afternoon jobs.
Ready to Create Your Dream Tiny-Apartment Christmas?
The 12 IKEA Christmas tree alternatives for tiny apartments with no floor space above cover light, texture, and structure: a single strand on a wall, a hanging cone, a pegboard, a living rosemary. Nobody needs all twelve, and one wall tree is a real Christmas.
Tonight, measure your emptiest wall and lay a strand of lights on the floor in a triangle, just to see it. By December, the room can feel lit from within instead of crowded around a tree. Pin the two or three ideas you’d try first, so they’re waiting when the decorations come out of the closet.
Keep Exploring
- 9 Tiny Apartment Christmas Decorating Ideas With Zero Floor Space
- 10 Small Bedroom Christmas Decor Ideas That Skip the Tree
- 8 Christmas Gift Wrapping Station Ideas for Small Apartments